Welcome to part 6 of the F5 to Avi migration series. The previous post in this series discussed the migration method for offline mode. In this post, I will demonstrate migrating complex L4 virtual services.
If you are not following along, I encourage you to read the earlier parts of this series from the links below:
1: Introduction to F5 to Avi Load Balancer Migration
2: F5 to Avi – Migration Strategy Framework
4: F5 to Avi – Online Mode Migration
5: F5 to Avi – Offline Mode Migration
Not all F5 virtual services can be migrated to Avi using the Avi Conversion Tool. The tool currently has a limitation of migrating L4 virtual services configured for SNI-based routing policy. When you attempt to convert such a VS to AVI format using the conversion tool UI, the tool skips the policies.
Migration of such virtual services is not possible through ACT UI, and you have to do this manually using the converter Python script. It is a complex procedure, and I will walk you through the step-by-step configuration of such a migration.
Before diving into the procedure, let’s look at the virtual service F5 configuration.
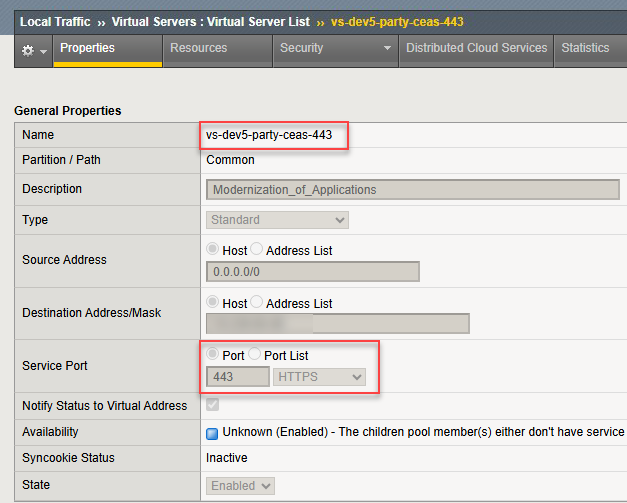
The VS “vs-dev5-party-ceas-443” is a standard VS, and it is listening on port 443.
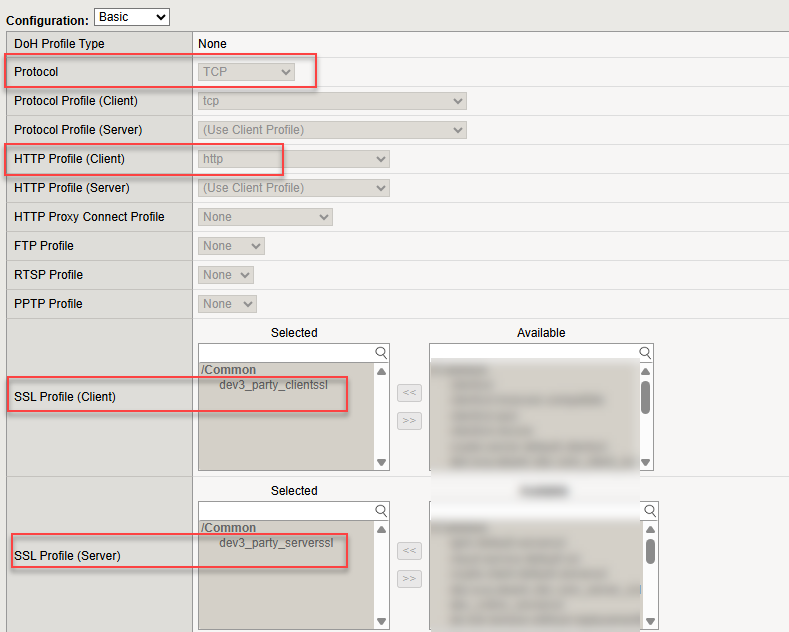
The VS type is L4 and is configured for SSL.
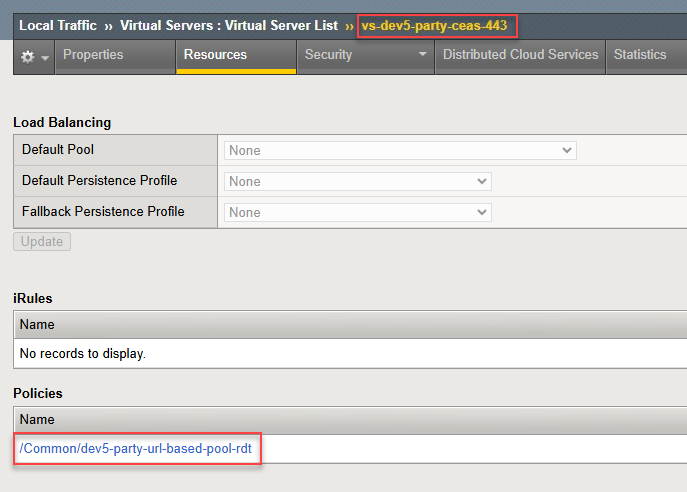
The VS has a policy named “dev5-party-url-based-pool-rdt” attached to it.
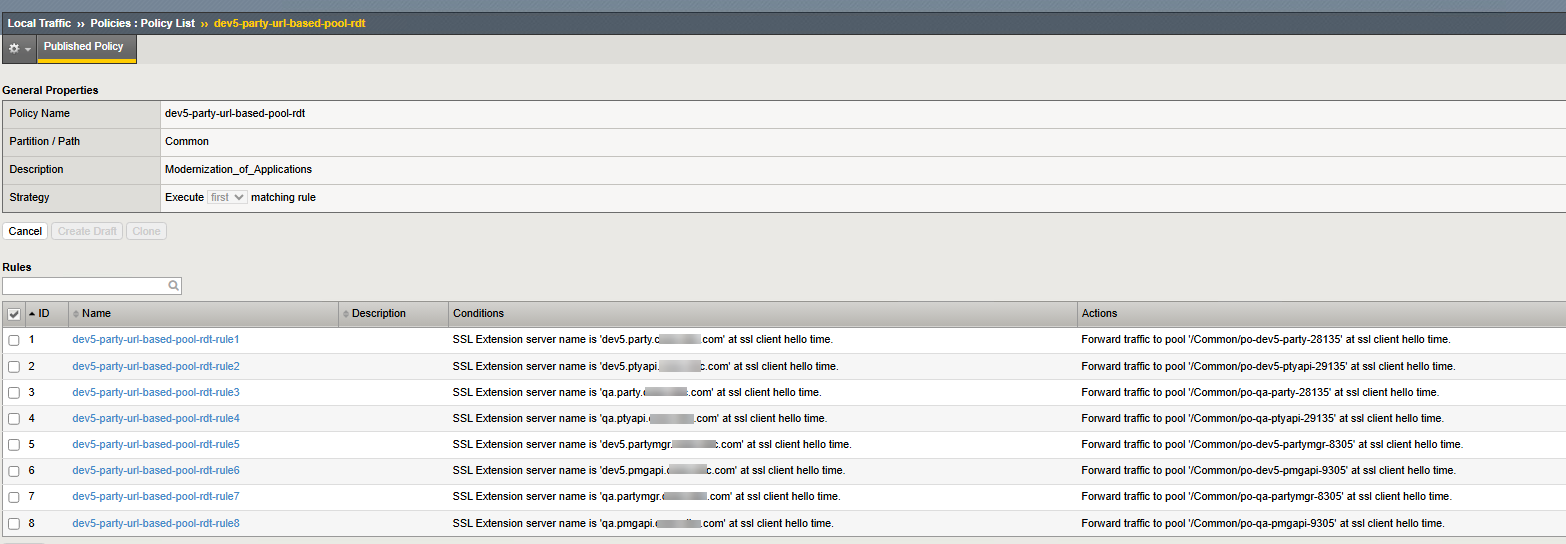
This policy is routing traffic to a specific pool based on the server name in the client header. As you can see in the screenshot below, different URLs are routed to individual pools listening on a specific port.
Now we have a baseline set; let’s look at an app selected for the migration.
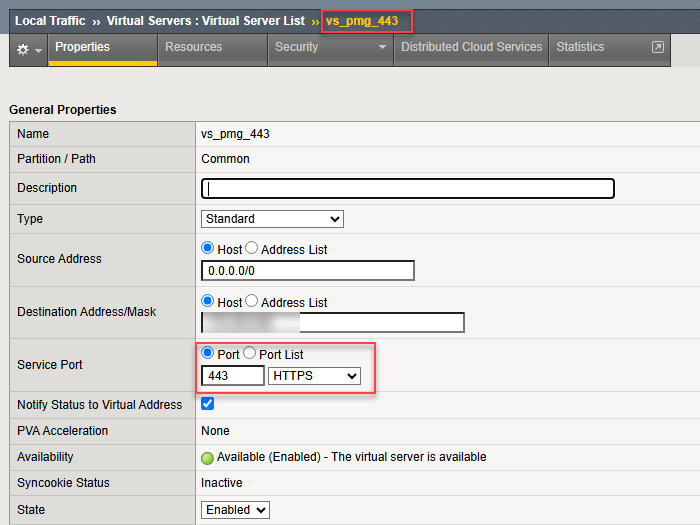
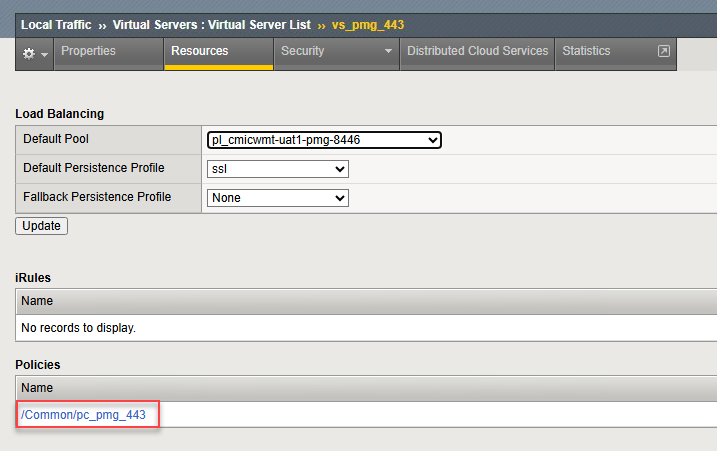
VS Name: pmg_443
Policy Name: pc_pmg_443
Let’s investigate the VS/Policy configuration in the F5 bigip.conf file. The following rulesets are configured for the VS:
- The VS has a catch-all condition configured, and the traffic is going to pool pmg-8446 (yellow box).
- For individual FQDNs, the traffic is routed to a specific pool (red box).
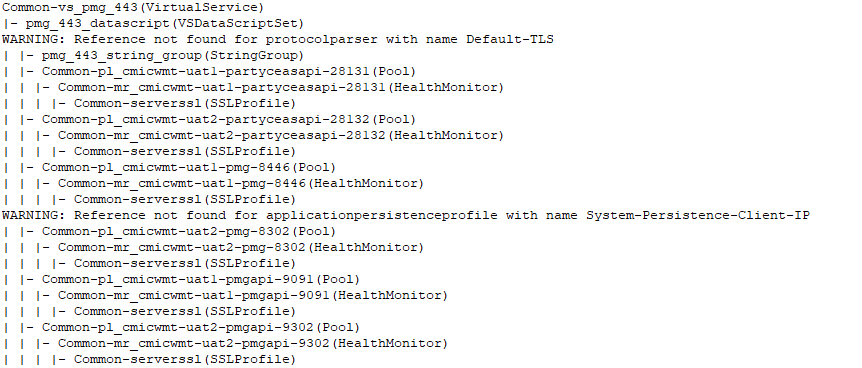
These rulesets are handled using Avi datascripts in Avi configuration.
The datascript parses the Client Hello packet to extract the SNI name and then selects a pool based on a string group lookup.
Migration Steps
Step 1: Export the F5 Configuration
Using CLI/UI, export the F5 bigip.conf file and save it on your local system.
Step 2: Create String Group JSON
The string group acts as a key-value pair, with the SNI name as the key and the corresponding pool name as the value. A key-value pair is formed by combining the “sni-host-name” from a policy’s rule condition and the “pool-name” from its rule action.
These key-value pairs should then be added into a JSON format, as shown in the example below, to form a JSON object for string group configuration.
|
1 2 3 4 5 6 7 8 9 10 11 12 13 14 15 16 17 18 19 20 21 22 23 24 25 26 27 |
{ "kv":[ { "key":"uat1.party.example.com", "value":"Common-pl_cmicwmt-uat1-partyceasapi-28131" }, { "key":"uat2.party.example.com", "value":"Common-pl_cmicwmt-uat2-partyceasapi-28132" }, { "key":"uat1.partymgr.example.com", "value":"Common-pl_cmicwmt-uat1-pmg-8446" }, { "key":"uat2.partymgr.example.com", "value":"Common-pl_cmicwmt-uat2-pmg-8302" }, { "key":"uat1.pmgapi.example.com", "value":"Common-pl_cmicwmt-uat1-pmgapi-9091" } ], "longest_match":false, "name":"pmg_443_string_group", "type":"SG_TYPE_KEYVAL" } |
Note 1: The name “pmg_443_string_group” is just a friendly name. This name is referenced by the datascript that is generated in step 3 and should match. Any mismatch in the name, and the CLI tool will not generate the right data.
Note 2: The string group file is unique per VS (that has policies). You can’t combine two VS/policies in the same file.
Note 3: The ACT tool automatically prefixes the “Common-” partition to the pool name while converting, so this prefix is added to the value.
Step 2: Create Datascript JSON
The datascript file provides the data for the object that needs to be created. This datascript includes logic for pool selection based on sni-hostname and references the string group (pmg_443_string_group) in two locations.
|
1 2 3 4 5 6 7 8 9 10 11 12 13 14 15 16 17 18 19 |
{ "datascript": [ { "evt": "VS_DATASCRIPT_EVT_TCP_CLIENT_ACCEPT", "script": "avi.l4.do_lb(false)" }, { "evt": "VS_DATASCRIPT_EVT_L4_REQUEST", "script": "local avi_tls = require \"Default-TLS\"\n\nlocal TLS_MSG_HDR_SZ = 5\n\n-- utility function for debugging\nfunction log_buffer_data(msg, data, len)\n hex_output = \"\"\n for i = 1, len do \n local byte_value = data:byte(i)\n hex_byte = string.format(\"%02X\", byte_value)\n hex_output = hex_output .. hex_byte .. \" \"\n end\n avi.vs.log(msg, \" \", hex_output)\nend\n\nfunction collect_tls_header()\n local buffered = avi.l4.collect(TLS_MSG_HDR_SZ)\n -- @debugger avi.vs.log (\"data buffered: \" , buffered, \" \")\n local data = avi.l4.read(TLS_MSG_HDR_SZ)\n -- the len should exclude the message size\n len = avi_tls.get_req_buffer_size(data)\n if len == nil then\n return nil\n end\n len = len - TLS_MSG_HDR_SZ\n return buffered, len\nend\n\nfunction collect_client_hello(buffered, len)\n --@debugger avi.vs.log (\"TLS record len : buffered \", len, \" \", buffered, \" \")\n local message_buffered = 0\n if buffered < len and buffered > TLS_MSG_HDR_SZ then\n message_buffered = avi.l4.collect(len - buffered - TLS_MSG_HDR_SZ)\n end\n \n --@debugger avi.vs.log(\"Total Message buffered : \", buffered + message_buffered, \" \")\n \n -- Parse the tls message\n local total_tls_msg = len + TLS_MSG_HDR_SZ\n ch_hello_message = avi.l4.read(total_tls_msg)\n local valid = avi_tls.sanity_check(ch_hello_message)\n if valid == false then \n return nil\n end\n\n -- ignoring second arg because only one message in client hello\n message, _ = avi_tls.parse_record(ch_hello_message)\n\n return message\nend\n\nfunction get_sni_name(message)\n -- Get the SNI name \n server_name = avi_tls.get_sni(message)\n --debugger avi.vs.log (\"server_name: \", server_name, \" \")\n return server_name\nend\n\nfunction sni_based_lb()\n buffered, len = collect_tls_header()\n if buffered == nil then\n avi_tls = nil\n avi.vs.log(\"Invalid Client Hello Recieved\")\n avi.vs.close_conn(1)\n end\n message = collect_client_hello(buffered, len)\n local reason = \"\"\n if message ~= nil then\n server_name = get_sni_name(message)\n if server_name ~= nil then\n -- stringgroup name is hardcoded, change below with correct reference\n pool_name, match = avi.stringgroup.equals(\"pmg_443_string_group\", server_name)\n if match == true then \n avi.pool.select(pool_name)\n reason = reason .. \"SNI Lookup successful \" .. server_name\n return true, reason\n else\n reason = reason .. \"SNI Lookup failed \" .. server_name\n return false, reason\n end\n else\n return false, \"Server name was not present or SNI extension not present\"\n end\n else\n return false, \"message parsing went incorrect\"\n end\nend\n\nmatch, reason = sni_based_lb()\nif match == false then \n avi.vs.log (\"Failure reason: \", reason, \" \")\nelse \n avi.vs.log(reason)\nend\navi.l4.ds_done()\navi_tls = nil\n\n\n" } ], "name": "pmg_443_datascript", "protocol_parser_refs": [ "/api/protocolparser?name=Default-TLS" ], "string_group_refs": [ "/api/stringgroup?name=pmg_443_string_group" ] } |
For similar policies, create the datascript object using the same JSON, modifying the name of the referenced string group as needed.
Note 1: The name “pmg_443_datascript” is a friendly name and is referenced by the patch.yaml that is generated in step 4.
Note 2: The string group name is referenced in two places in the datascript file. Update the name at both places.
Step 4: Create the patch.yaml file for VS customization.
The patch file defines the changes to apply to that virtual service. Update the file to match the VS that needs to be migrated.
1: match_name: Common-<vs-name-in-f5>
2: vs_datascript_set_ref: Update the datascript name here.
3: enabled: true <– this flag enables the VS in Avi when the config is pushed.
4: traffic_enabled: false (for pre-build activity, keep this flag disabled). For the cutover day, this flag needs to be enabled, and the playbook needs to be regenerated manually.
5: tenant=<avi-tenant>&cloud=<Avi-cloud-name>: This should match the tenant/cloud where VS will be created.
6: pool_refs: This section contains all the pools that are referenced by the policies. This should match the pool name in the string group file.
A sample patch.yaml file is shown below for reference.
Note: You need to prefix the pool name with “Common-” to match the partition name in F5
|
1 2 3 4 5 6 7 8 9 10 11 12 13 14 15 16 17 18 |
VirtualService: - match_name: Common-vs_pmg_443 patch: vs_datascripts: - index: 1 vs_datascript_set_ref: /api/vsdatascriptset/?name=pmg_443_datascript enabled: true traffic_enabled: false VSDataScriptSet: - match_name: pmg_443_datascript patch: pool_refs: - /api/pool?name=Common-pl_cmicwmt-uat1-partyceasapi-28131&tenant=dev-tnt&cloud=nsx-cloud - /api/pool?name=Common-pl_cmicwmt-uat2-partyceasapi-28132&tenant=dev-tnt&cloud=nsx-cloud - /api/pool?name=Common-pl_cmicwmt-uat1-pmg-8446&tenant=dev-tnt&cloud=nsx-cloud - /api/pool?name=Common-pl_cmicwmt-uat2-pmg-8302&tenant=dev-tnt&cloud=nsx-cloud - /api/pool?name=Common-pl_cmicwmt-uat1-pmgapi-9091&tenant=dev-tnt&cloud=nsx-cloud |
Step 5: Create VS Object Ref JSON File
This is just an empty file. The tool references this file for populating VS information.
|
1 2 |
{ } |
You should have the following files on your local system now. Store the files in a folder named pmg_443
- bigip.conf
- string_group.json
- datascript.json
- vs_objs_refs.json
- patch.yaml
Note: You will need to adjust the permissions of the upload folder for the file transfer.
Create Terminal Sessions
Create 2 terminal sessions – one for ACT VM and another for the “avimigrationtools” container running on ACT VM. This is required so as to avoid switching between 2 for the subsequent commands.
- All the commands that are required to be executed from the VM terminal session are prefixed by [VM]
- For creating a Docker container terminal session using the sudo -i command. All the commands that are required to be executed from this terminal session are prefixed by [CONTAINER]
Create Ansible Playbooks for Migration
Step 1: [VM] SSH to the ACT VM and switch to the root user: sudo -i
Step 2: [VM] Open another terminal session and SSH to the ACT VM and create a container session: # docker exec -it migrationTools bash
Step 3: [CONTAINER] cd /server/uploads/pmg_443
3a: Execute the F5 converter with the following command
|
1 |
[CONTAINER] f5_converter.py -o /server/uploads/pmg_443/output --autogen_irules -f /server/uploads/pmg_443/bigip.conf --not_in_use --tenant=dev-tnt --cloud_name=nsx-cloud --vrf=avi-t1 --segroup SEG_DEV |
Note: The vrf name should match the vrf-context name in Avi.
The f5 converter script converts the VS objects and stores the config in yaml files.
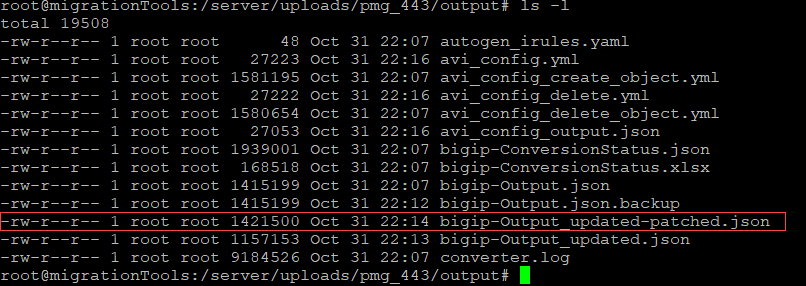
The following files are created in the output directory specified in the converter command:
3b: Backup the generated Avi config json file
Step 4: Switch to another terminal session and execute the command to patch the generated Avi config output json with the datascript and string group objects.
|
1 2 3 |
[VM] jq --slurpfile stringgroup <(jq '. + {"tenant_ref": "/api/tenant/?name=dev-tnt"}' /opt/avimigrationtools/uploads/pmg_443/string_group.json) \ --slurpfile datascript <(jq '. + {"tenant_ref": "/api/tenant/?name=dev-tnt"}' /opt/avimigrationtools/uploads/pmg_443/datascript.json) \ '.StringGroup += $stringgroup | .VSDataScriptSet += $datascript' /opt/avimigrationtools/uploads/pmg_443/output/bigip-Output.json | sudo tee /opt/avimigrationtools/uploads/pmg_443/output/bigip-Output_updated.json > /dev-tnt/null |
The above commands create the bigip-Output_updated.json file in the output directory.
Step 5: Create a patched file that patches pools to datascript and datascript to virtual service.
|
1 |
[Container] config_patch.py -c /server/uploads/pmg_443/output/bigip-Output_updated.json -p /server/uploads/pmg_443/patch.yaml -o /server/uploads/pmg_443/output/ |
The above command creates a patched output file named bigip-Output_updated-patched.json in the output directory.
Step 6: Create Playbooks
Execute the playbook generation script with the below command to create a final Ansible playbook for a particular VS
Note: In the below command, the –vs_filter flag should match the name as specified in the patch.yaml file (Common-<vs-name>)
|
1 |
[Container] avi_updation_to_playbook_generation.py --vs_obj_refs_data /server/uploads/pmg_443/vs_objs_refs.json --avi_config /server/uploads/pmg_443/output/bigip-Output_updated-patched.json -o /server/uploads/pmg_443/output --vs_filter Common-vs-pmg_443-cibc-com --controller_version 30.2.4 |
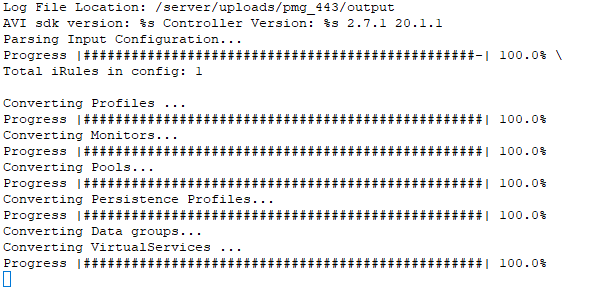
Command output:
The above command creates 2 files
- avi_config.yml: which is an Ansible playbook that CREATES the objects on the Avi controller.
- avi_config_delete.yml: which is an Ansible playbook that DELETES the created objects from the Avi controller.
Note: The resulting playbooks must have the traffic_enabled flag set on the VS. Validate the same before pushing the config to the Avi controller.
Step 7: Execute Ansible Playbook
7a: Execute the create ansible-playbook command to push the configuration to the AVI controller. This playbook will create a VirtualService, Pool with Health Monitor, StringGroup, and a VSDatascript on the Avi controller.
|
1 |
[CONTAINER] ansible-playbook /server/uploads/pmg_443/output/avi_config.yml --extra-vars "controller=<controller-ip> username=<username> password=<passwd>" |
7b: Update VS Certificate
The ACT tool doesn’t convert the VS original certificate. It creates a new self-signed certificate and attaches it to the VS. You need to manually import the certificate and update the VS to use this certificate.
7c: If any created objects are to be deleted, then execute the delete ansible-playbook command to delete the configuration from the Avi controller.
|
1 |
[CONTAINER] ansible-playbook /server/uploads/pmg_443/output/avi_config_delete.yml --extra-vars "controller=<controller-ip> username=<username> password=<passwd>" |
This will delete the previously created VirtualService, Pool with Health Monitor, StringGroup, and VSDatascript from the Avi controller.
Verify that these objects are deleted from the AVI controller.
Note: If you need to update the VS configuration by enabling/disabling adding any parameter, then you need to regenerate the playbooks by running the commands in Steps 5 to 7
And that’s it for this post. In the next post of this series, I will demonstrate migrating an L7 app with policies. Stay tuned!!!
I hope you enjoyed reading this post. Feel free to share this on social media if it’s worth sharing.


