
Welcome to part 9 of the VCF-9 series. The previous post in this series discussed how to create Virtual Private Clouds (VPCs) with centralized network connectivity. In this post, I will dive deep into the fundamentals of VPC networking.
If you are not following along, I encourage you to read the earlier parts of this series from the links below:
1: VCF-9 Architecture & Deployment Models
4: NSX Edge Cluster Deployment
5: ESXi Host Commission in VCF
6: Deploying a Workload Domain
7: Deploy VCF Operations for Logs
8: VPC Creation with Centralized Networking
Part 3 of this series discussed the networking models in VCF-9. In the previous post, I covered the concepts of default transit gateway and VPC gateway, as well as the types of subnets that can be created in a VPC. It is essential to recall these concepts to comprehend VPC networking.
Lab Topology
In my lab, I deployed a couple of VPCs in the default NSX project and created the public, private, and transit subnets.
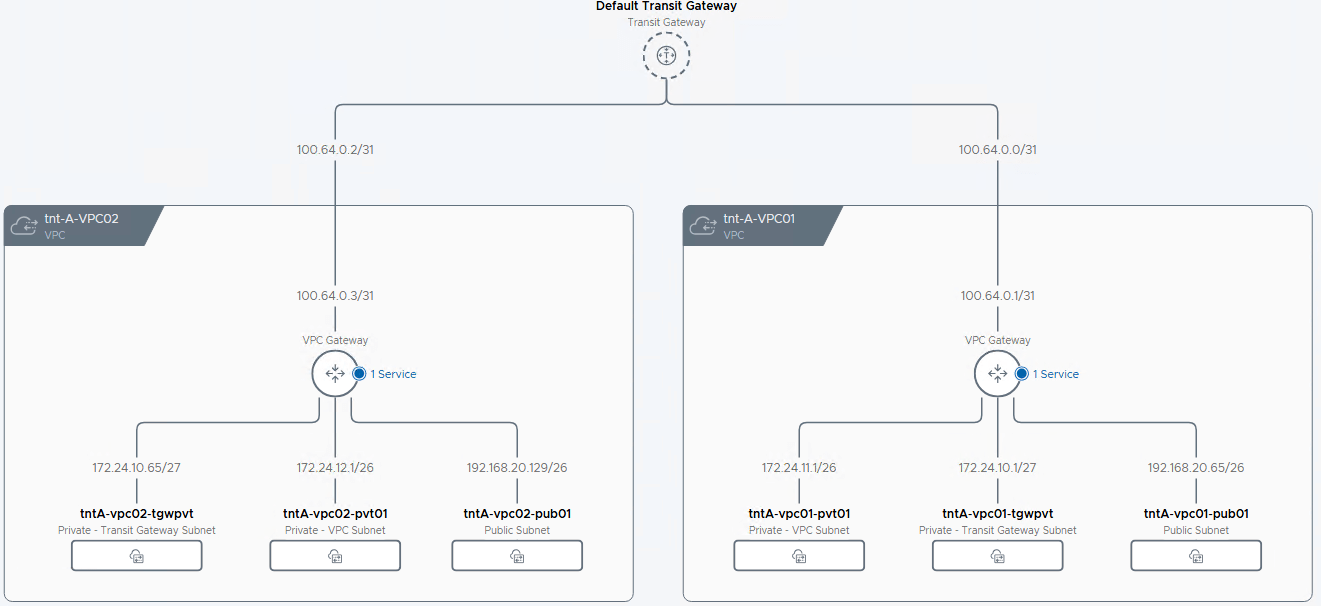
The VPC has the following subnets:
| Subnet Name | Subnet CIDR | Gateway |
| tntA-vpc01-pub01 | 192.168.20.64/26 | 192.168.20.65 |
| tntA-vpc01-tgwpvt | 172.24.10.0/27 | 172.24.10.1 |
| tntA-vpc01-pvt01 | 172.24.11.0/26 | 172.24.11.1 |
| tntA-vpc02-pub01 | 192.168.20.128/26 | 192.168.20.129 |
| tntA-vpc02-tgwpvt | 172.24.10.64/27 | 172.24.10.65 |
| tntA-vpc02-pvt01 | 172.24.12.0/26 | 172.24.12.1 |
To view the subnets summary in a VPC, select the VPC in vCenter and navigate to Networks > VPC Subnets.
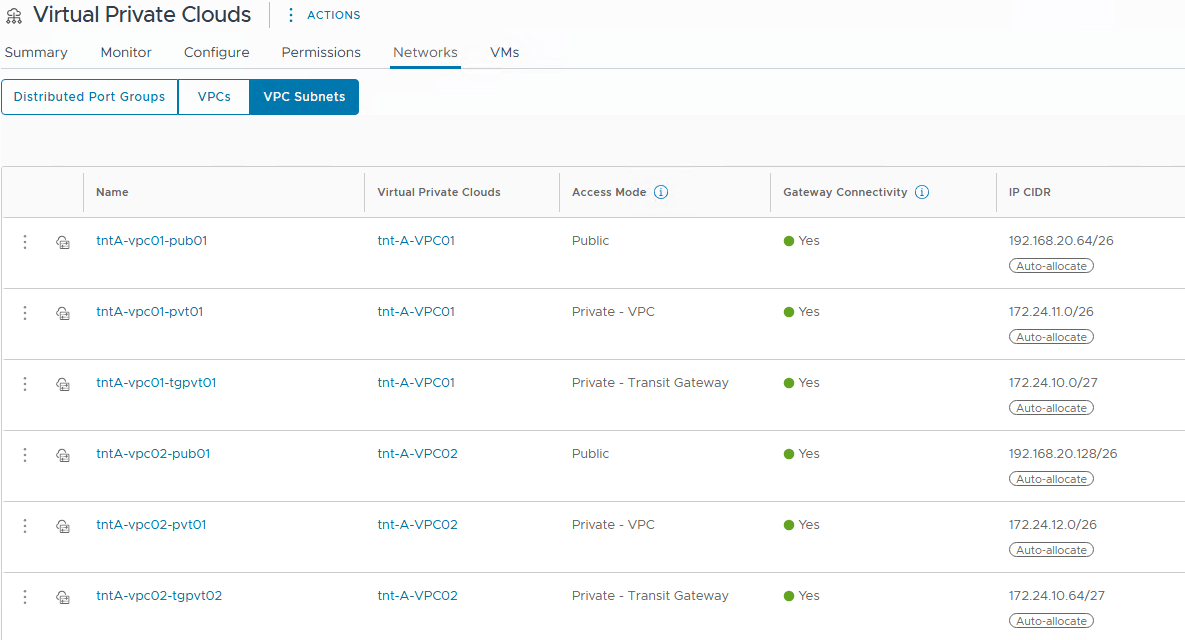
The following VMs are created in the VPC and attached to the subnets.
| VM Name | IP Address | Subnet |
| vpc01-pub-vm01 | 192.168.20.66 | tntA-vpc01-pub01 |
| vpc01-pvt-vm01 | 172.24.11.2 | tntA-vpc01-pvt01 |
| vpc01-transit-vm01 | 172.24.10.2 | tntA-vpc01-tgwpvt |
| vpc02-pub-vm01 | 192.168.20.130 | tntA-vpc02-pub01 |
| vpc02-pvt-vm01 | 172.24.12.2 | tntA-vpc02-pvt01 |
| vpc02-transit-vm01 | 172.24.10.66 | tntA-vpc02-tgwpvt |
Connectivity Test
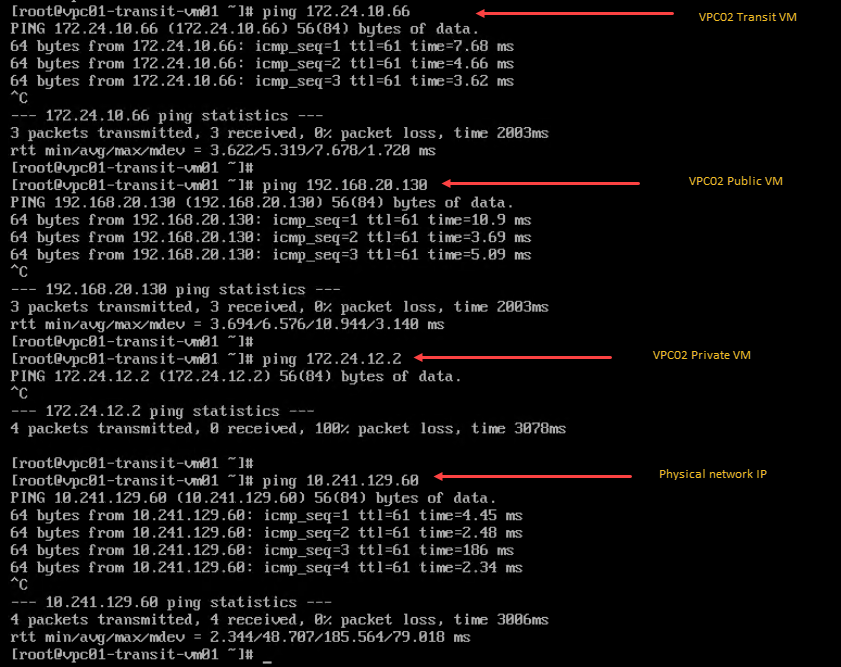
1: Ping test from the VPC01 public subnet
- VPC01 public subnet to VPC02 public subnet: Ping test succeeded.
- VPC01 public subnet to VPC02 private subnet: Ping test failed.
- VPC01 public subnet to VPC02 private TGW subnet: Ping test succeeded.
- VPC01 public subnet to physical network: Ping test succeeded.
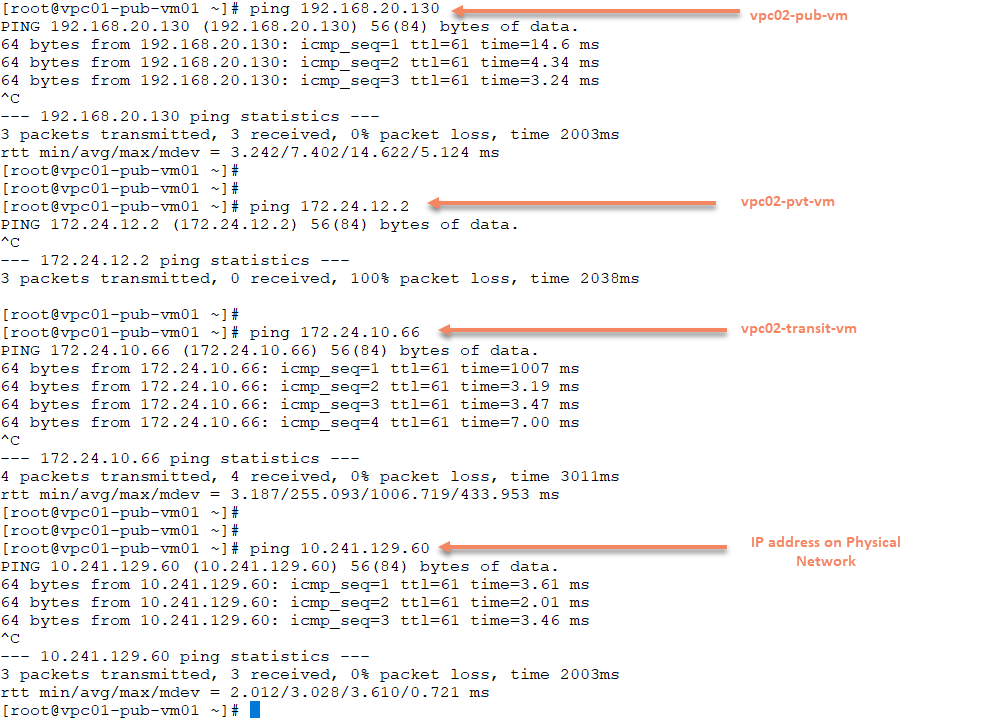
The public subnet is routable and is advertised to northbound routers.
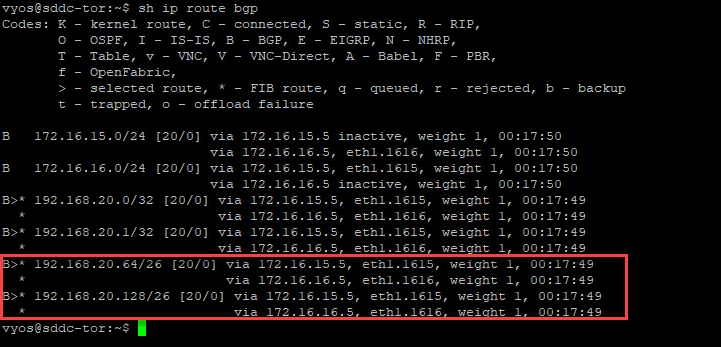
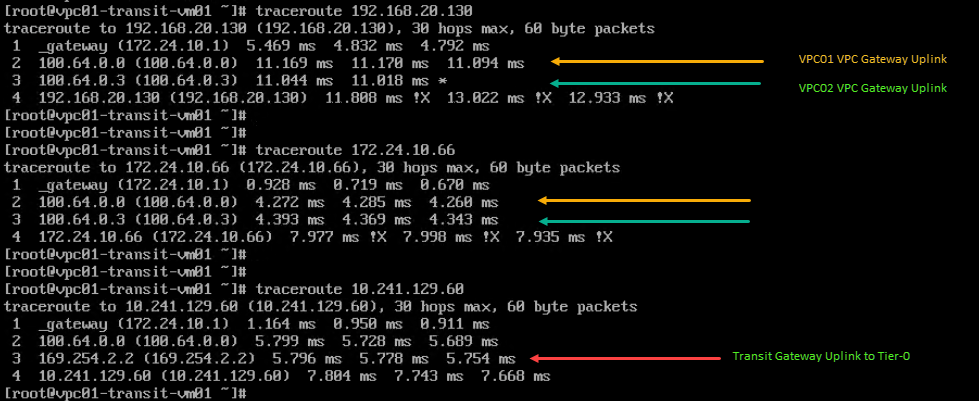
The communication between the public subnets of the VPCs or between the public subnet and the private transit subnet is facilitated through the transit gateway. For physical connectivity, the transit gateway sends the packet to the northbound router through the Tier-0 gateway.
There is no connectivity to the VPC private subnet.

2: Ping test from the VPC01 private transit gateway subnet
- VPC01 transit subnet to VPC02 transit subnet: Ping test succeeded.
- VPC01 transit subnet to VPC02 public subnet: Ping test succeeded.
- VPC01 transit subnet to VPC02 private subnet: Ping test failed.
- VPC01 transit subnet to physical network: Ping test succeeded.
The communication between the private transit subnets of the VPCs or between the private transit subnet and the public subnet is facilitated through the transit gateway. For physical connectivity, the transit gateway sends the packet to the northbound router through the Tier-0 gateway.
There is no connectivity to the VPC private subnet.
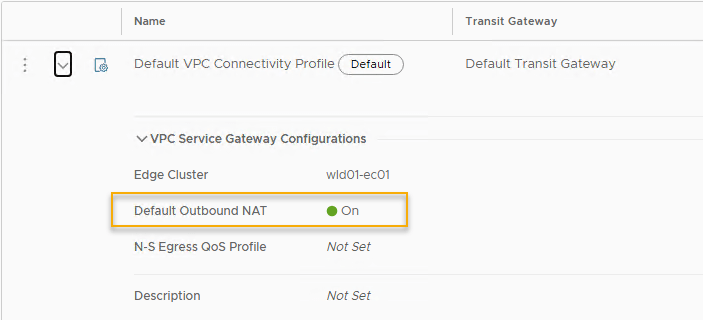
For the PC private transit subnets’ outbound connectivity, NSX automatically creates SNAT rules (if default outbound NAT is enabled) to map them to the external network. Also, a tag is created to denote it’s an auto-created rule for the VPC.

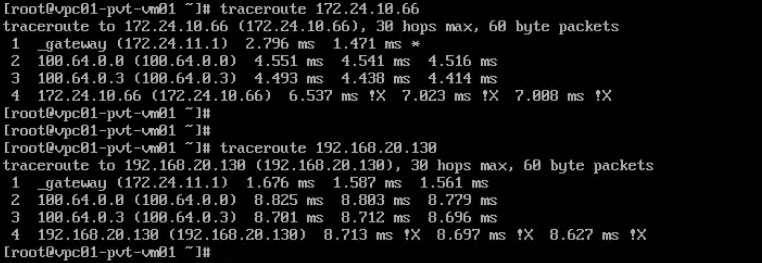
3: Ping test from the VPC01 private subnet
- VPC01 private subnet to VPC02 private subnet: Ping test failed.
- VPC01 private subnet to VPC02 transit subnet: Ping test succeeded.
- VPC01 private subnet to VPC02 public subnet: Ping test succeeded.
- VPC01 private subnet to physical network: Ping test failed.
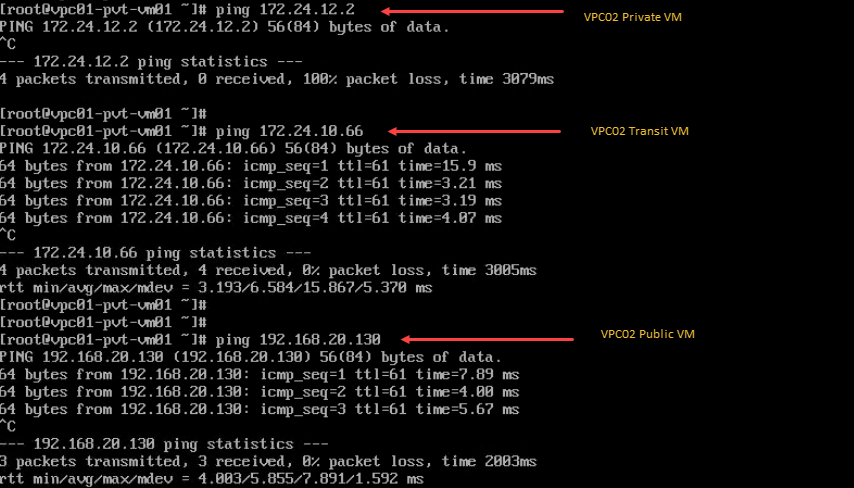
The VPC private subnet can communicate with the other VPC’s public and transit subnets. The communication is established via the VPC’s Transit Gateway.
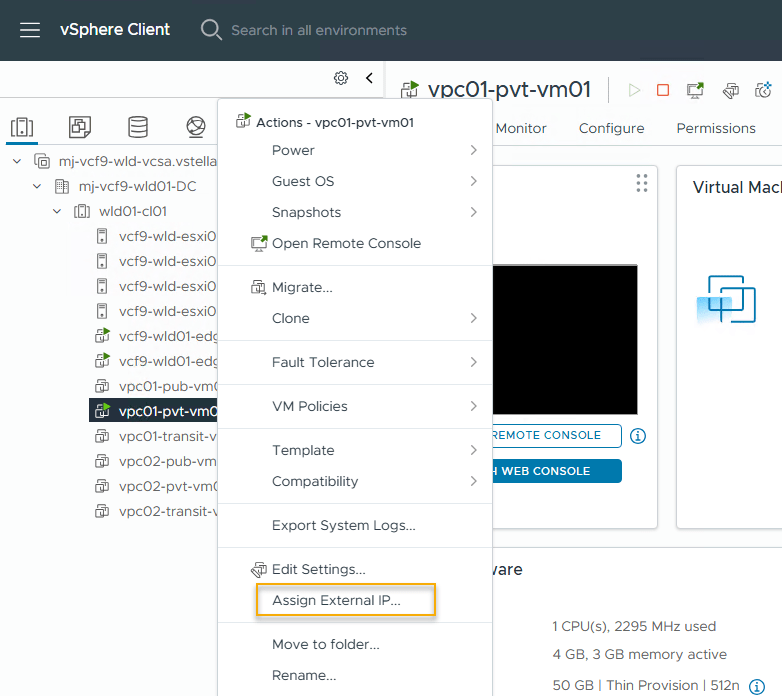
Assign External IP to VMs
Since a private subnet is not routable outside the VPC, you can’t connect to the VMs connected to the private subnet. However, a new feature is introduced in VCF 9 where you can assign an external IP address to a private VM and connect the VM using its external address. This IP address is allocated from the external network that you configure during edge deployment.
To assign an external IP to a VM, right-click on the VM and select the ‘Assign External IP’ action.
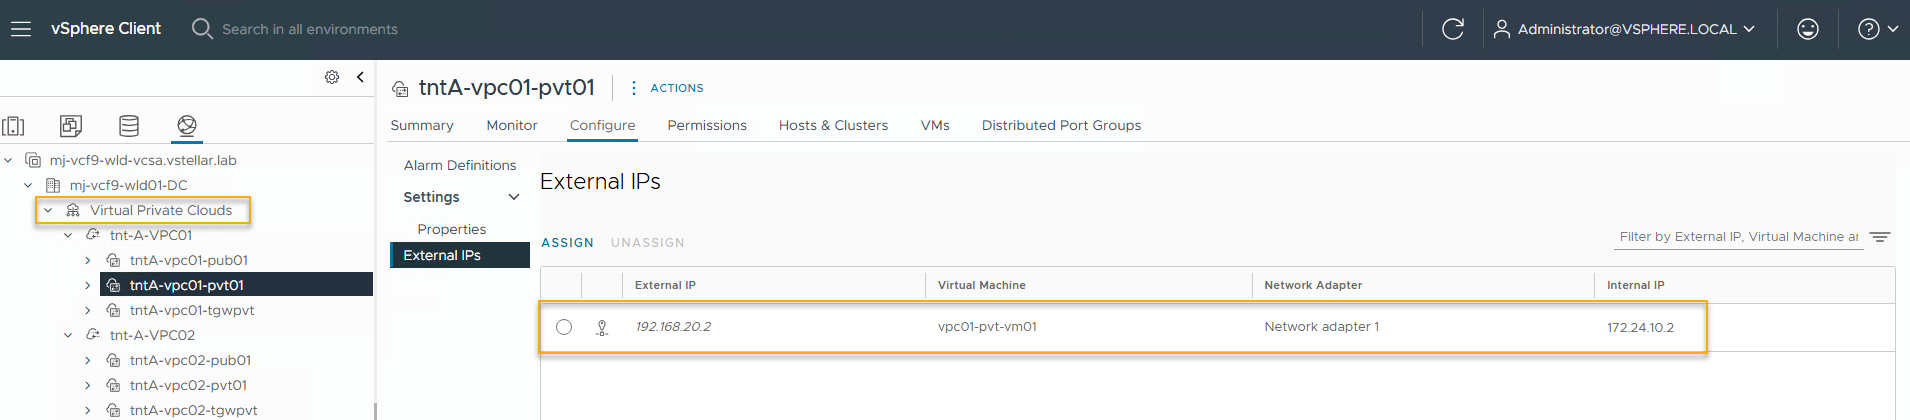
Select the desired network interface of the VM.

To view the assigned external IP address of the VM, select the subnet under the VPC and navigate to Configure -> External IPs.
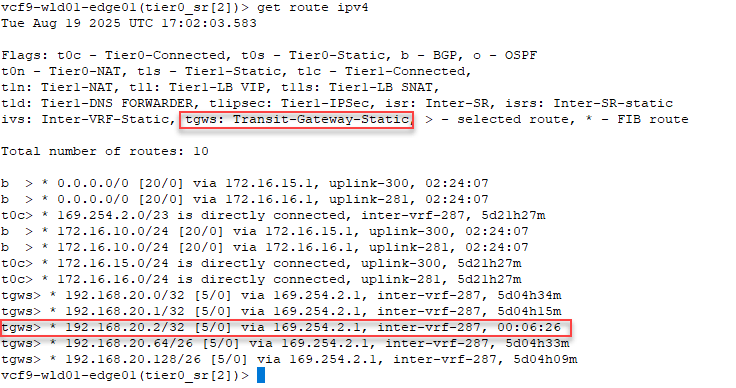
The external IP address is advertised to the northbound router as a /32 network.

On the Transit gateway, the VM external address is received as the tier-1 NAT advertised by the VPC gateway.

On the Tier-0 gateway, the VM external address is received as a static route advertised by the transit gateway.
And that’s it for this post. In the next post of this series, I will discuss the activation of supervisor services in a VPC in the VCF workload domain. Stay tuned!!!
I hope you enjoyed reading this post. Feel free to share this on social media if it is worth sharing.