
Tanzu Kubernetes Grid 1.3 brought many enhancements with it, and one of them was the support for NSX Advanced Load Balancer for load balancing the Kubernetes-based workloads. TKG with NSX ALB is fully supported in VMC on AWS. In this post, I will discuss the deployment of TKG v1.3 in VMC.
In this post, I will not cover the steps of NSX ALB deployment, as I have already documented it here
Prerequisites
Before starting the TKG deployment in VMC, make sure you have met the following prerequisites:
- SDDC is deployed in VMC, and outbound access to vCenter is configured.
- Segments for NSX ALB (Mgmt & VIP) are created.
- NSX ALB Controllers and Service Engines are deployed, and the controllers’ initial configuration is completed.
Deployment Steps
Create Logical Segments & Configure DHCP
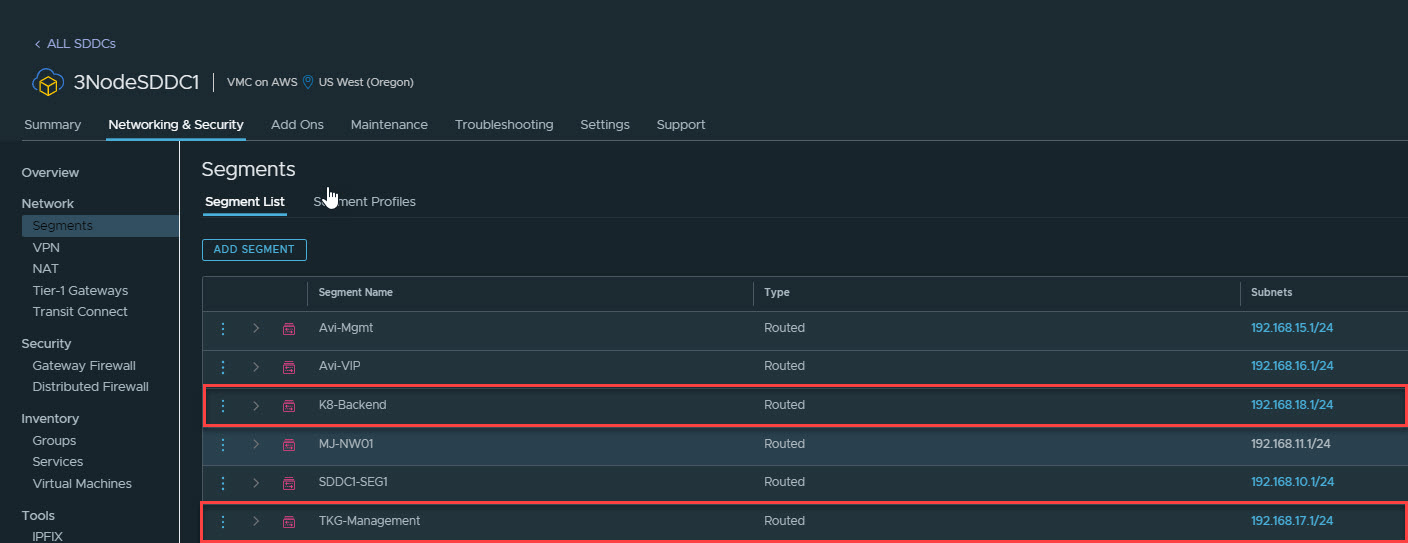
Create 2 DHCP-enabled logical segments (one for the TKG Management and one for the TKG Workload) in your SDDC by navigating to Networking & Security > Network > Segments.
An example is shown below
| Network Type | Segment Name | Type | CIDR | DHCP Pool |
| TKG-Management | TKG-Management | Routed | 192.168.17.0/24 | 192.168.17.101-192.168.17.250 |
| TKG-Workload | K8-Backend | Routed | 192.168.18.0/24 | 192.168.18.2-192.168.18.99 |
Make sure that the IP address that you will be using as the cluster IP when deploying the mgmt/workload cluster is excluded from the DHCP range configured.
Note: The bootstrapper VM will also connect to the TKG-Management logical segment.
Port, Protocols & Firewall Rules
Ensure that the following ports/protocols are allowed in your firewall configuration for a successful TKG deployment.
| Source | Destination | Protocol and Port | Scope | Description |
| NSX ALB Management Network | vCenter Server | TCP:443 | Compute and Management Gateway | Allow AVI to read vCenter and PG information |
| TKG Management and Workload Network | DNS Server | UDP:53 | Compute Gateway | Name Resolution, |
| TKG Management and Workload Network | NTP Server | UDP:123 | Compute Gateway | Time Synchronization |
| TKG Management and Workload Network | vCenter Server | TCP:443 | Compute and Management Gateway | To access vCenter, create VMs and Storage Volumes |
| TKG Management and Workload Network | Internet | TCP:443 | Compute Gateway | Allow components to retrieve container images required for cluster building from repos listed under ~/.tanzu/tkg/bom/ |
| TKG Management and Workload Network | AVI Management Network | TCP 443 | Compute Gateway | Allow TKG clusters to communicate with AVI for LB and Ingress Configuration |
| TKG Management Cluster Network | TKG Workload Cluster IP | TCP:6443 | Compute Gateway | Allow the management cluster to configure the workload cluster |
| TKGWorkload Cluster Network | TKG Management Cluster IP | TCP 6443 | Compute Gateway | Allow the Workload cluster to register with the management cluster |
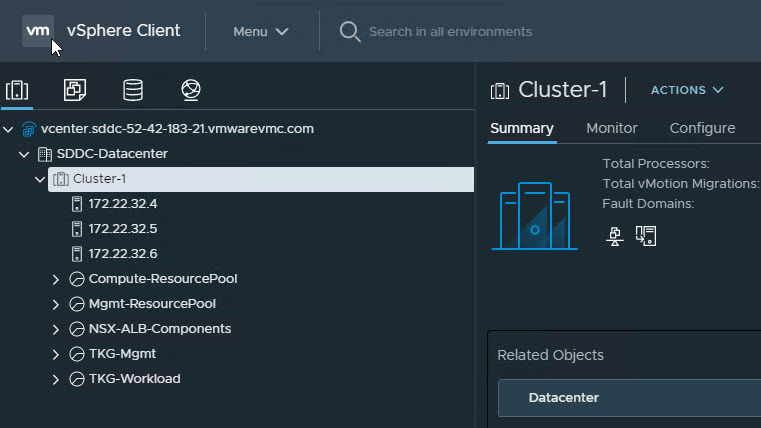
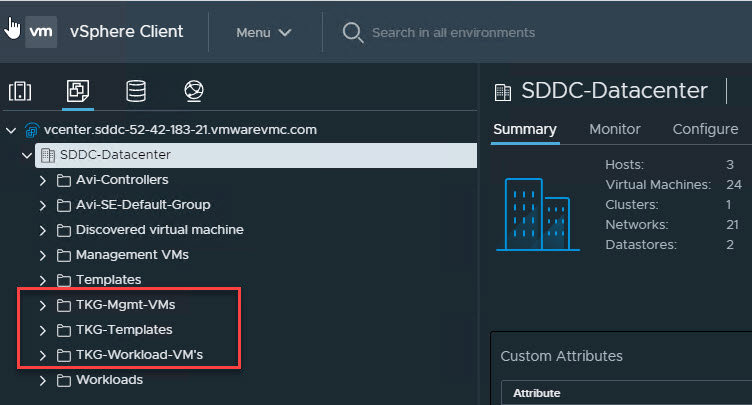
(Optional) Configure Resource Pools, VM folders in vCenter
Although this step is optional, I would recommend creating a dedicated folder and resource pools to separate the TKG Management VMs (Control Plane/Worker nodes) from the TKG workload VMs.
I have the following Resource Pools and Folders created in my environment.
Download Kubernetes Templates and TKG Tools
To deploy the TKG instance, you have to first import the supported version of Kubernetes OVA into your vCenter server and convert the imported image into a template. This template is used by the TKG installer to deploy the management and workload cluster.
To know about the supported K8’s version with TKG 1.3.1, please see the TKG Release Notes
You can download the Kubernetes ova for TKG 1.3.1 deployment from here
TKG Management cluster makes use of “Photon v3 Kubernetes v1.20.5 vmware OVA”, so to deploy a management cluster, you need to download the following files from the VMware portal
- Photon v3 Kubernetes v1.20.5 OVA
- VMware Tanzu CLI
- Kubectl cluster cli v1.20.5
Configure Bootstrap Environment
The bootstrap environment is the machine where you install the Tanzu CLI and Kubectl utilities and then use these utilities to trigger the deployment of TKG management and workload clusters. This machine also keeps the TKG and Kubernetes configuration files of your deployments.
In the VMC on AWS environment, the bootstrap machine must be a cloud VM, not a local machine, and should meet the following prerequisites.
- The bootstrapper should have a minimum of 6 GB of RAM and a 2-core CPU.
- System time is synchronized with a Network Time Protocol (NTP) server.
- Docker is installed. For instructions on how to install Docker, please refer to the Docker official documentation
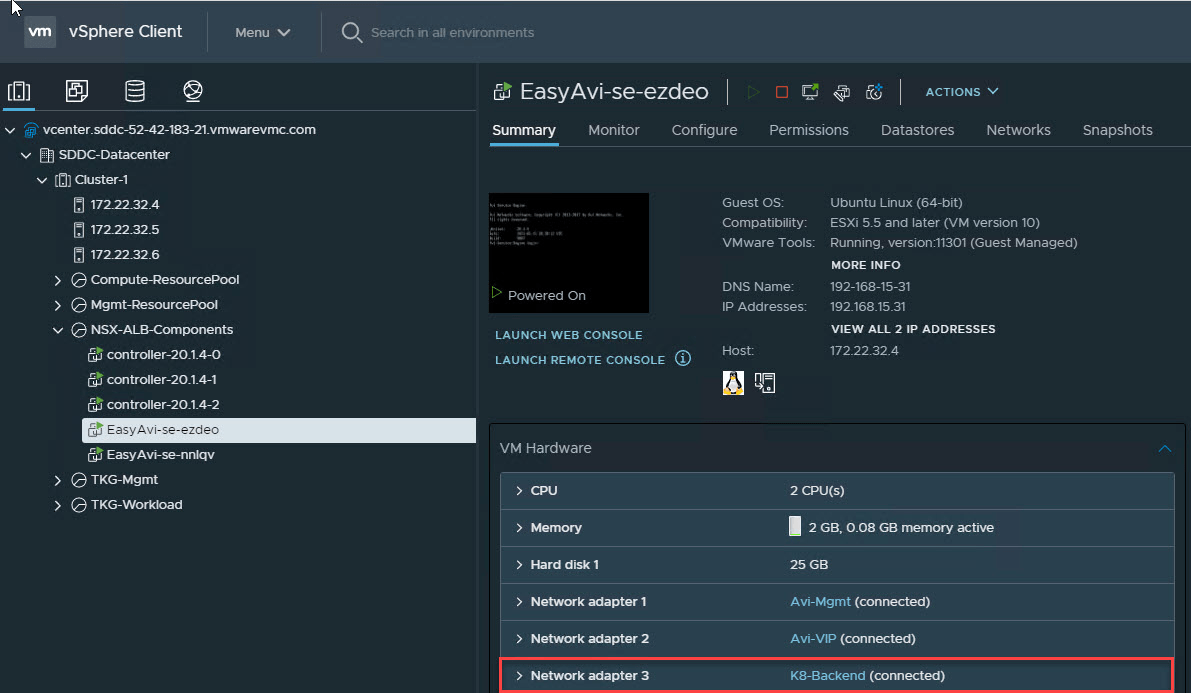
Note: In my environment, I have deployed a Ubuntu 20.4 instance in VMC SDDC and attached it to the logical segment dedicated to the TKG management cluster.
To use the TKG installation binaries, upload the Tanzu CLI and Kubectl binary to the bootstrapper machine using WinSCP or a similar utility and unpack them using the system utilities like winrar (for Windows) or tar (for Linux).
Install the Tanzu CLI Binary
After you unpack the Tanzu CLI bundle file, you will see a cli folder with multiple subfolders and files. Use the command below to install the Tanzu CLI
|
1 2 3 4 5 6 7 |
# tar -xvf tanzu-cli-bundle-v1.3.1-linux-amd64.tar # cd cli/ # sudo install core/v1.3.1/tanzu-core-linux_amd64 /usr/local/bin/tanzu # chmod +x /usr/local/bin/tanzu |
At the command line, run tanzu version to check that the correct version of the CLI is properly installed.
|
1 2 3 4 |
root@tkg-bootstrap:~# tanzu version version: v1.3.1 buildDate: 2021-05-07 sha: e5c37c4 |
Install the Tanzu CLI Plugins
After you have installed the tanzu core executable, you must install the CLI plugins related to Tanzu Kubernetes cluster management and feature operations.
Navigate to the tanzu folder that contains the cli folder and run the following command to install the plugins.
# tanzu plugin install –local cli all
Check plugin installation status.
# tanzu plugin list
If successful, you should see a list of all installed plugins. For example:

Install Kubectl
Kubectl utility can be installed by running the following commands:
|
1 2 3 4 5 |
# gunzip kubectl-linux-v1.20.5-vmware.1.gz # mv kubectl-linux-v1.20.5-vmware.1 /usr/local/bin/kubectl # chmod +x /usr/local/bin/kubectl |
Create an SSH key pair.
This is required for Tanzu CLI to connect to vSphere from the bootstrap machine. The public key part of the generated key will be passed during the TKG management cluster deployment
|
1 |
# ssh-keygen -t rsa -b 4096 -C "[email protected]" |
The above command prompts you to enter the file in which to save the key. Press Enter to accept the default.
Enter and repeat a password for the key pair.
Add the private key to the SSH agent running on your machine, and enter the password you created in the previous step.
|
1 |
# ssh-add ~/.ssh/id_rsa |
If the above command fails, execute “eval $(ssh-agent)” and then rerun the command.
Make a note of the public key from the file $home/.ssh/id_rsa.pub and have it handy. You need this when creating a config file for deploying the TKG management cluster.
Deploy Management Cluster
The management cluster is a Kubernetes cluster that performs the role of the primary management and operational center for the Tanzu Kubernetes Grid instance. This is the first element that you deploy when you create a Tanzu Kubernetes Grid instance.
You can deploy management clusters in two ways:
- Run the Tanzu Kubernetes Grid installer, a wizard interface that guides you through the process of deploying a management cluster.
- Create and edit YAML configuration files, and use them to deploy a management cluster with the CLI commands.
The UI installer is the recommended method by VMware, and I will be using the same. To launch the UI installer wizard, run the following command on the bootstrapper machine:
# tanzu management-cluster create –ui –bind <bootstrapper-ip>:8080 –browser none
Open a browser and enter http://<bootstrapper-ip>:8080/ to launch the TKG installer wizard.
Note: If you are seeing a connection refused error, make sure that you have allowed port 8080 in the firewall running on your bootstrapper machine.
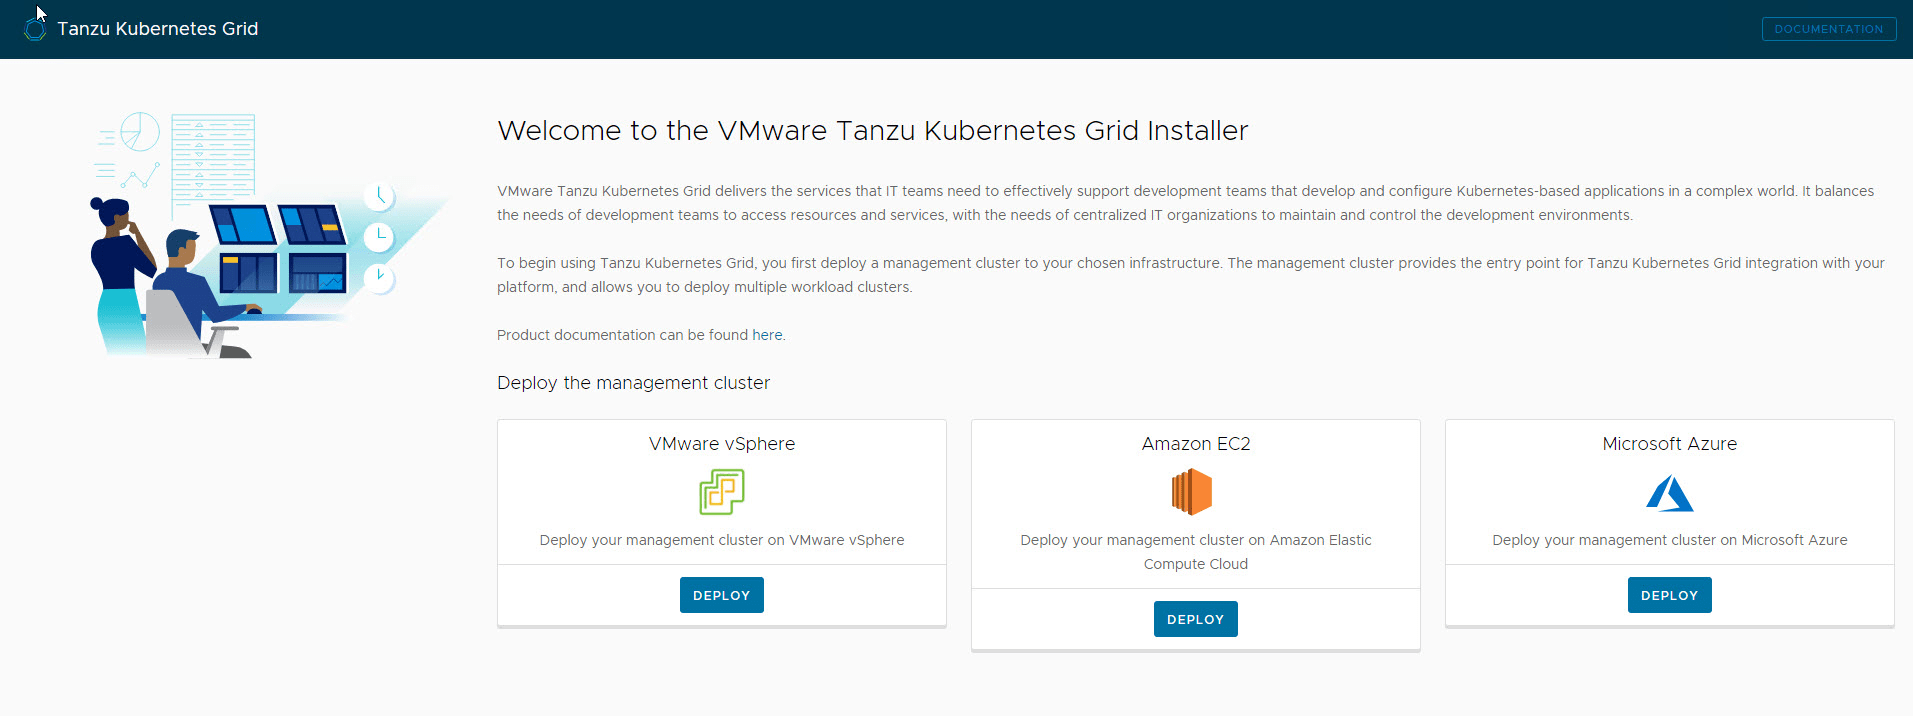
Click the deploy button under “VMware vSphere.”
On the “IaaS Provider” page, enter the IP/FQDN and credentials of the vCenter server where the TKG management cluster will be deployed.
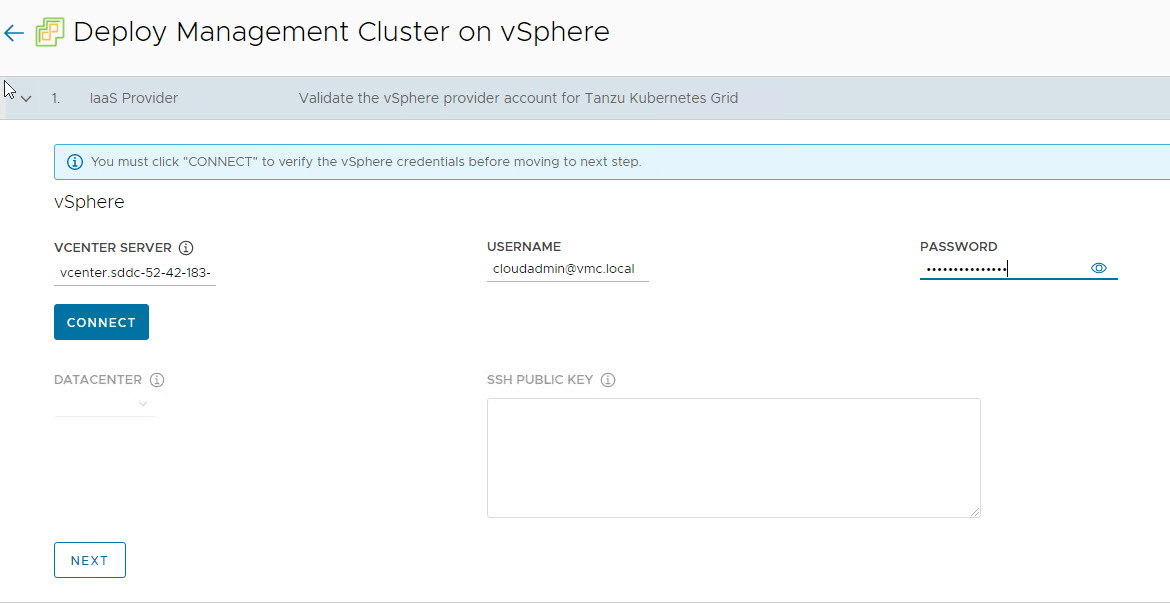
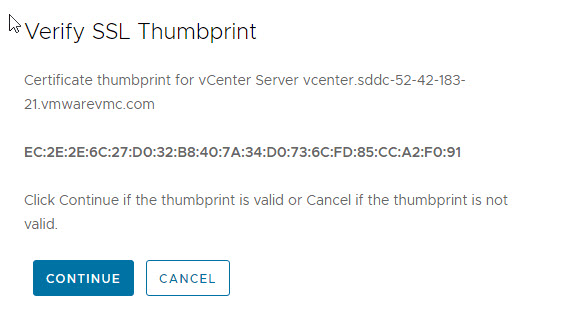
Clicking on the connect button prompts you to accept the vCenter server SSL thumbprint.
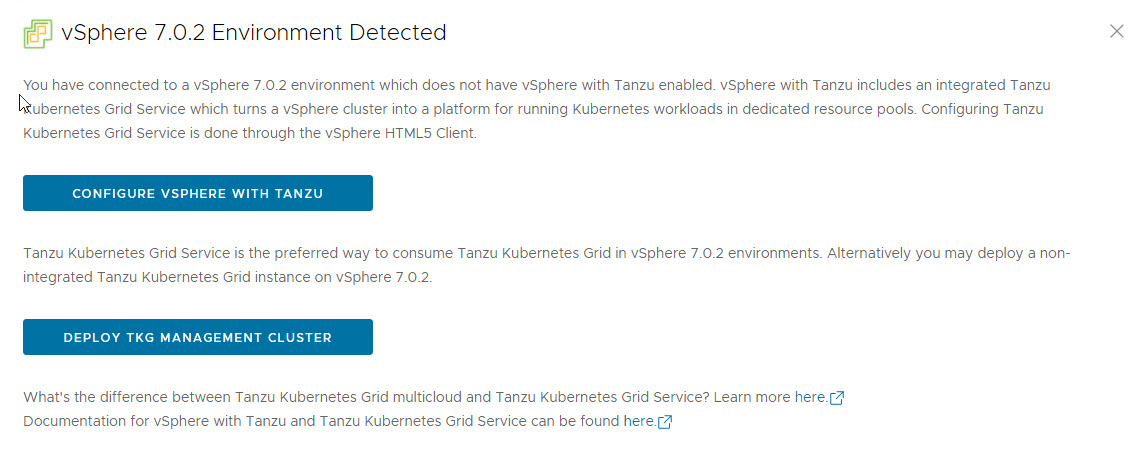
If you are running a vSphere 7.x environment, the TKG installer will detect it and provide the user a choice to deploy either vSphere with Tanzu (TKGS) or the TKG management cluster.
Click on the TKG Management Cluster.
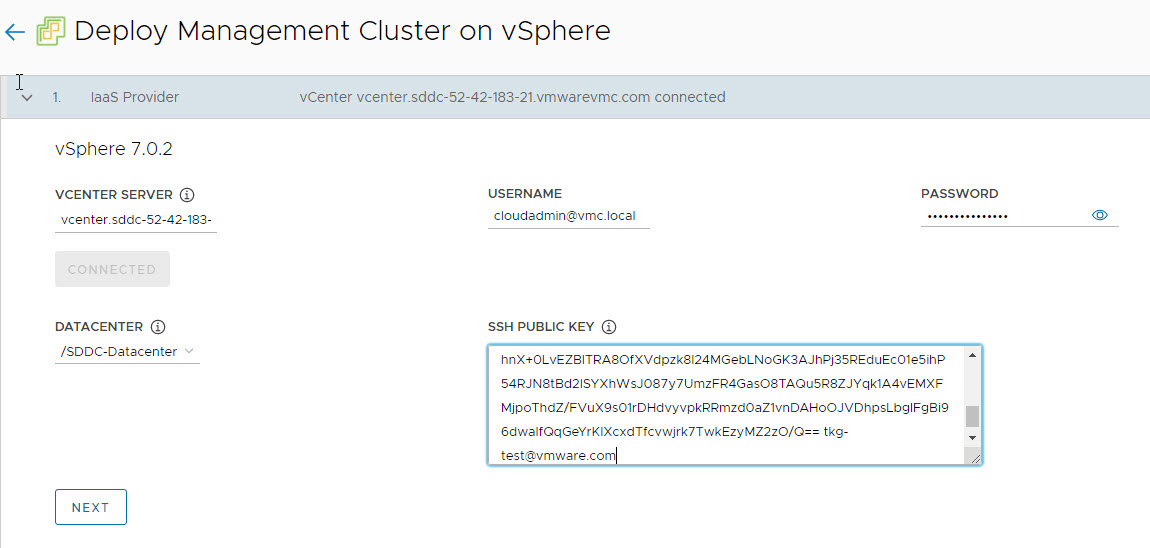
Select the Virtual Datacenter and punch in the SSH public key that you have generated earlier.
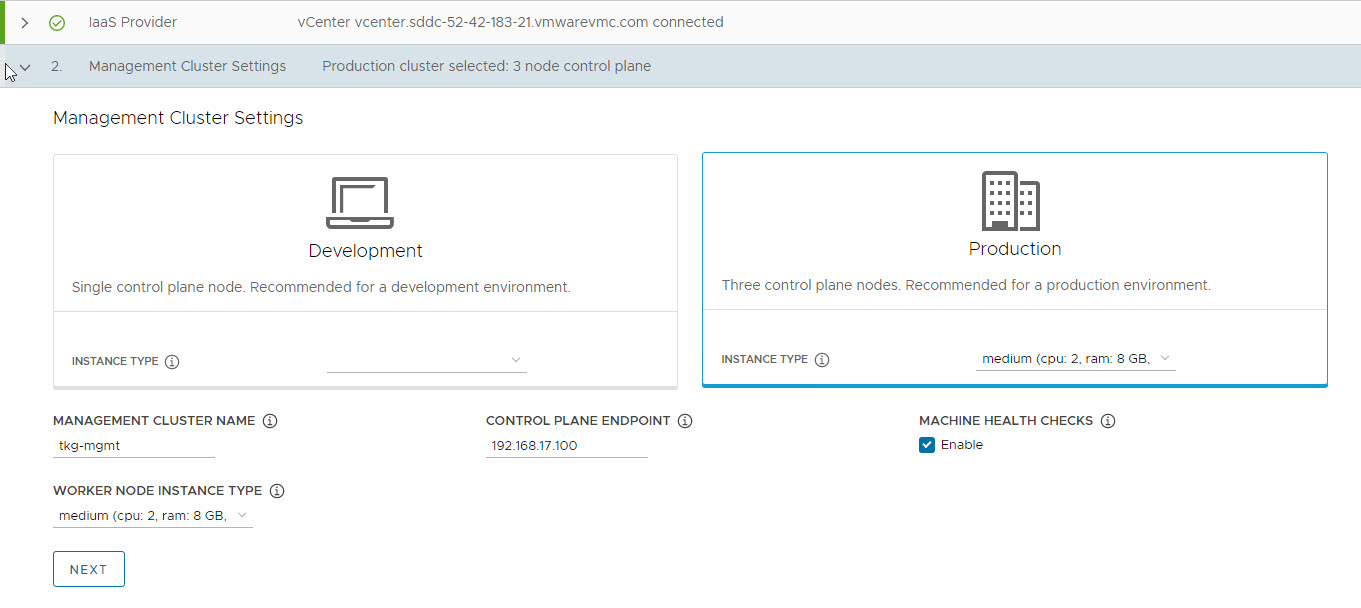
On the Management cluster settings page, select the instance type for the control plane node and the worker node and provide the following info:
- Management Cluster Name: Name for your management cluster.
- Control Plane Endpoint: A free IP from the network created for TKG management. Ensure that the IP address you provide is not part of the DHCP range configured on the network.
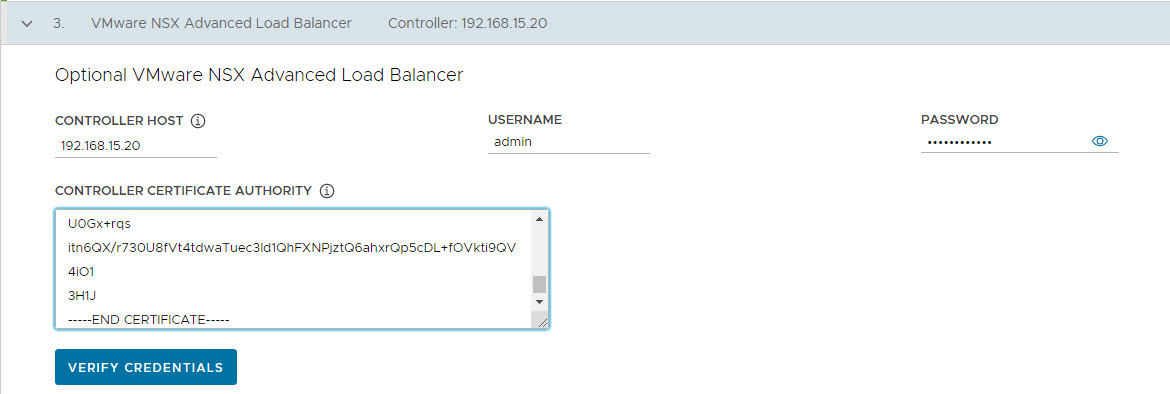
On the NSX Advanced Load Balancer page, provide the following:
- Controller IP address (Cluster IP if controller cluster is configured)
- Controller credentials.
- Controller certificate.
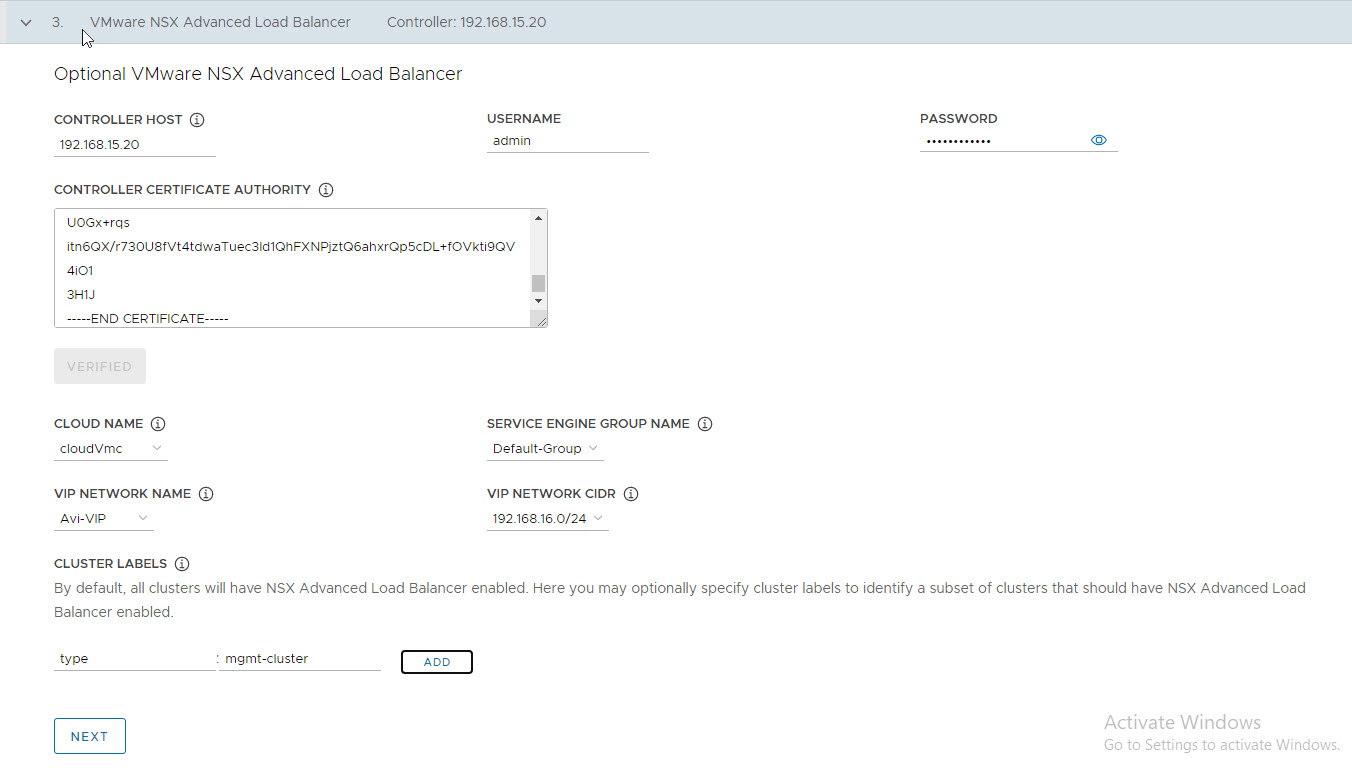
Clicking on the Verify button and select the following:
- Cloud Name
- SE Group name
- VIP Network
- VIP Network CIDR
Optionally provide labels for your deployment.
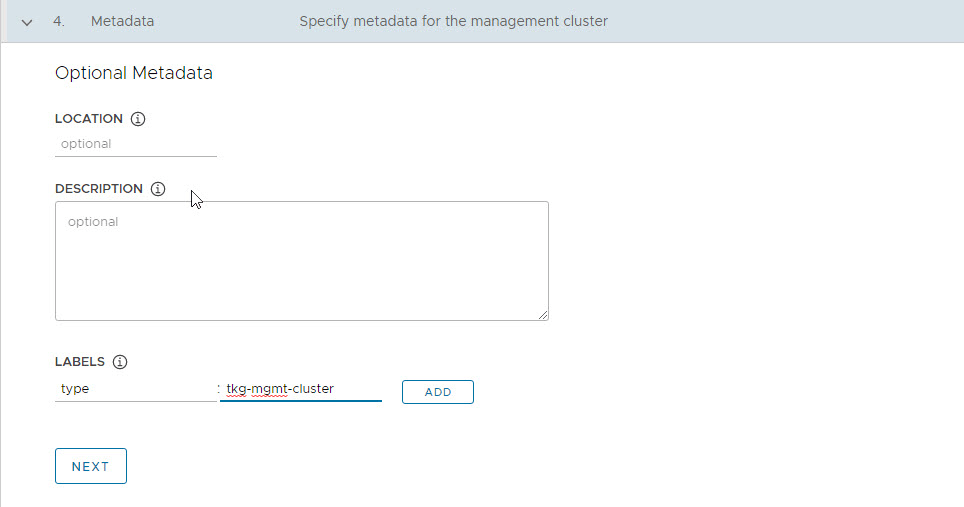
On the Metadata page, you can specify location and labels. Both of these settings are optional and can be left blank.
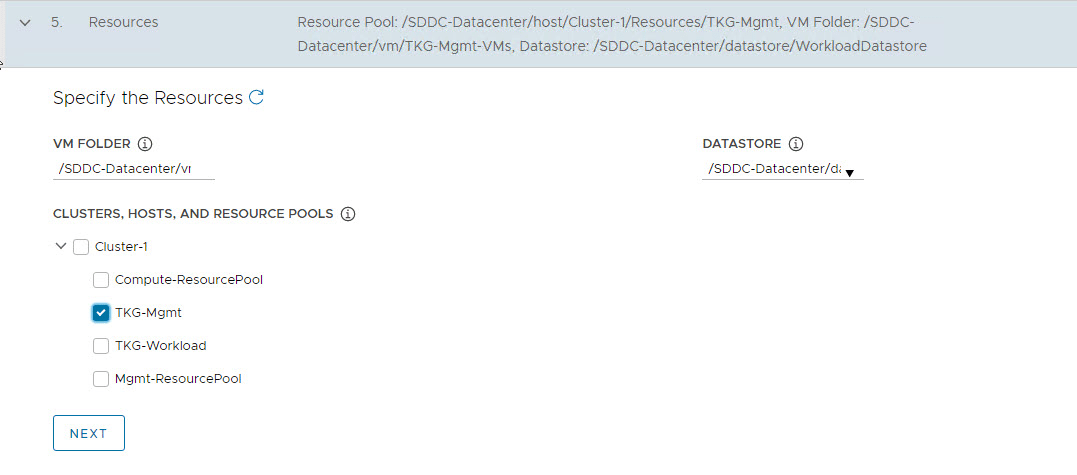
On the Resources page, specify the compute containers for the TKG management cluster deployment.
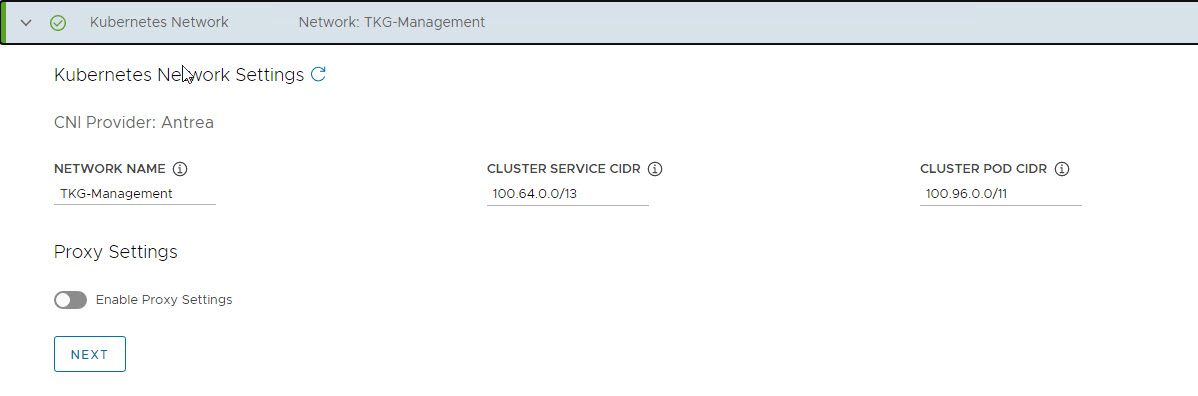
On the Kubernetes Network page, select the Network where the control plane and worker nodes will be placed during management cluster deployment.
Optionally, you can change the Service and Pod CIDR to custom values.
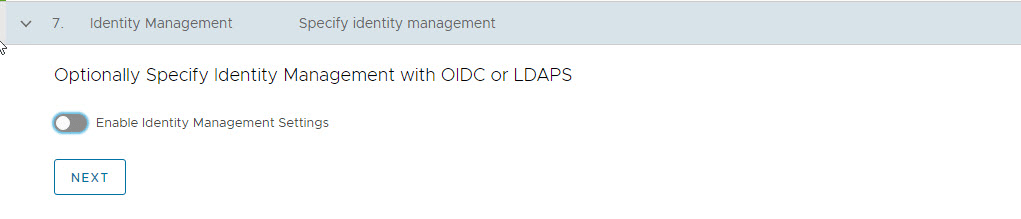
If you have LDAP configured in your environment, please consult VMware Documentation for the instructions on how to integrate an identity management system with TKG.
I am not using any identity management system in my environment, so I have disabled this setting.
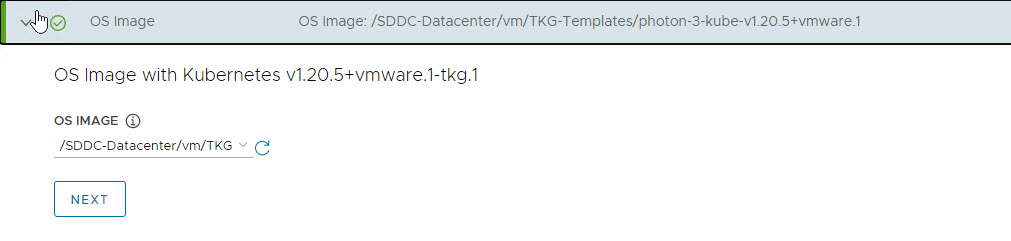
Select the OS image that will be used for the management cluster deployment.
Please note that this list will appear empty if you don’t have a compatible template present in your environment. Once you have imported the correct template, you can come here and click on the refresh button, and the installer will detect the image automatically.
If you have a subscription to Tanzu Mission Control and want to register your management cluster with the TMC, punch in the registration URL here.
I am planning to do a manual registration later, so I have skipped this step for now.
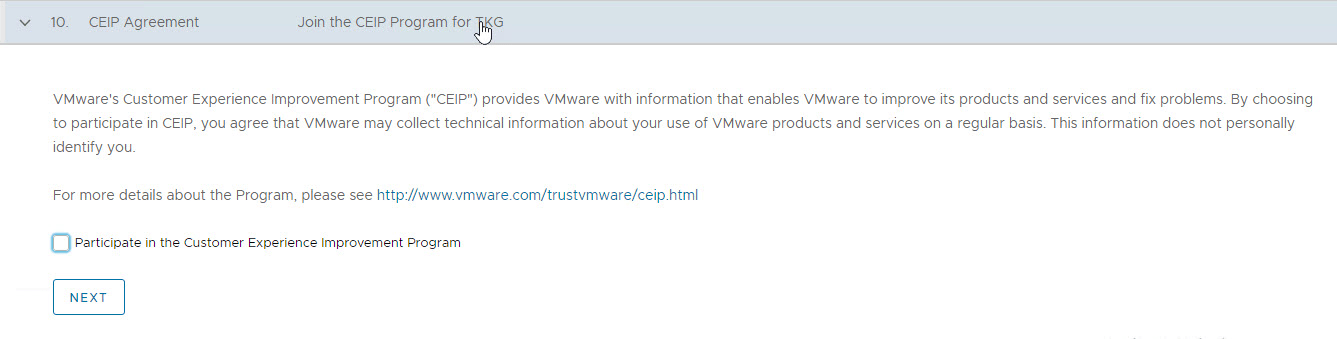
I have opted out of the CEIP.
Click on the Review Configuration button to verify your configuration settings.
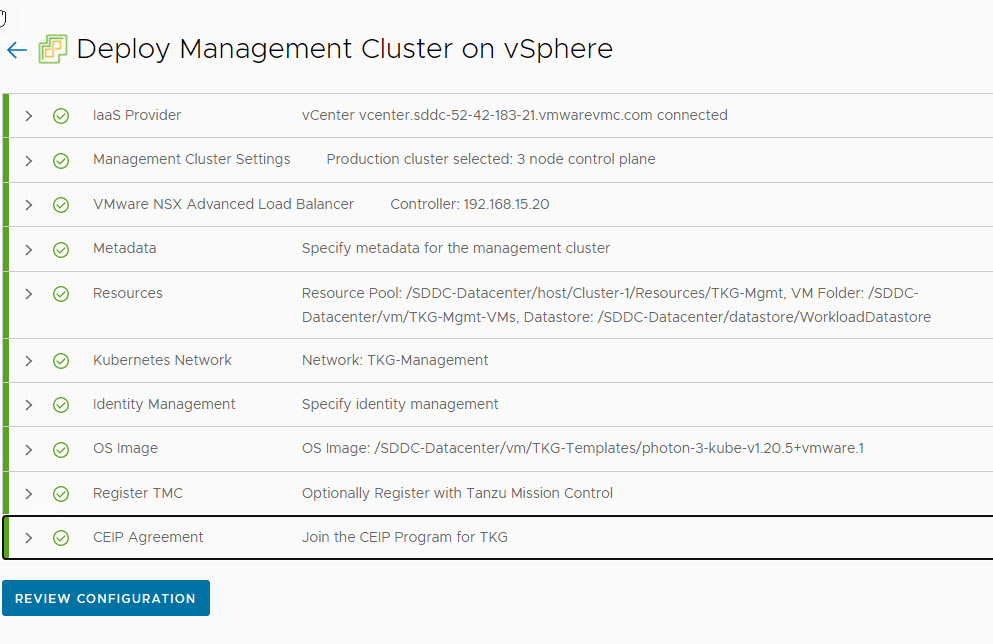
Once the configuration settings have been verified, management cluster deployment can be triggered from the UI. Alternatively, you can use the CLI command that the installer has generated for you.

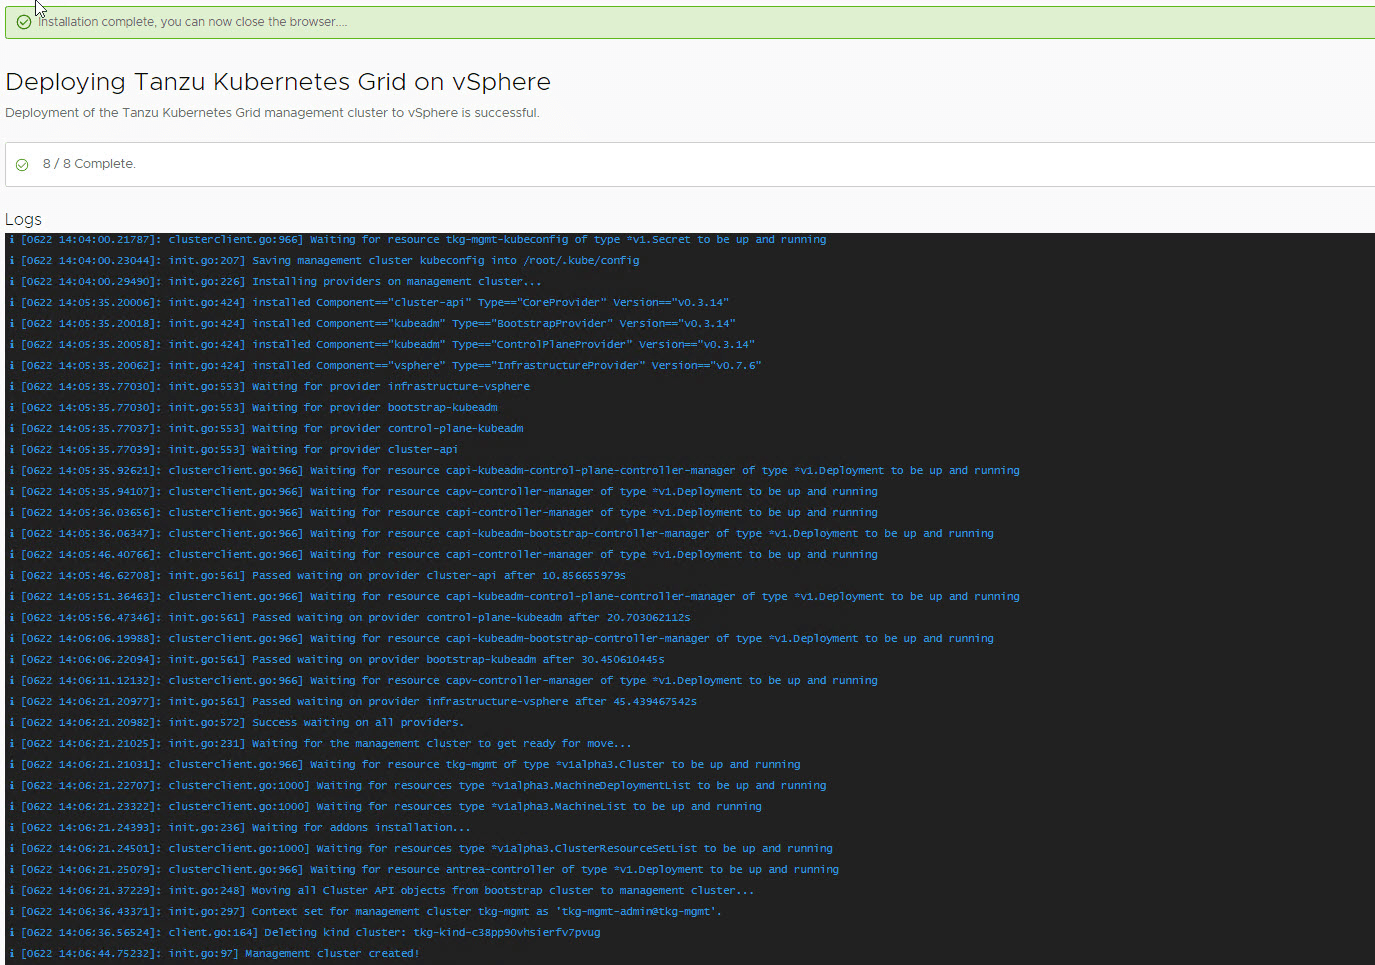
I have triggered the deployment from the UI. The installer displays the deployment logs on the screen.
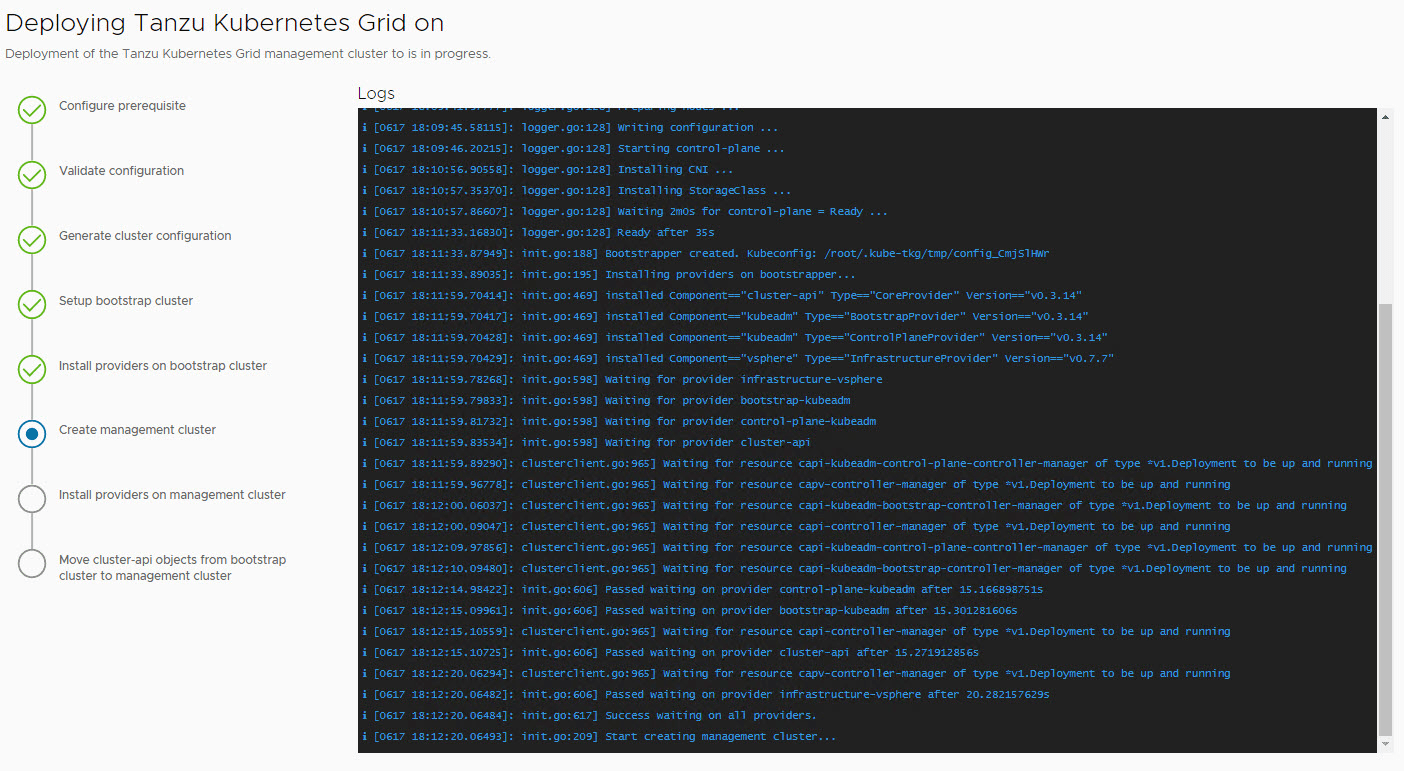
Management cluster deployment took approximately 20 minutes to complete. The installer will automatically set the context to the management cluster so that you can login to it and perform additional tasks.
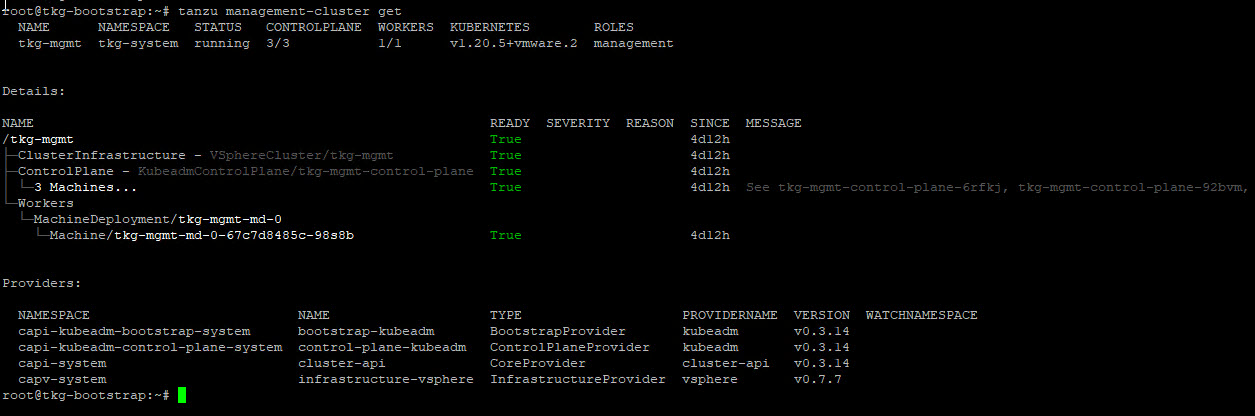
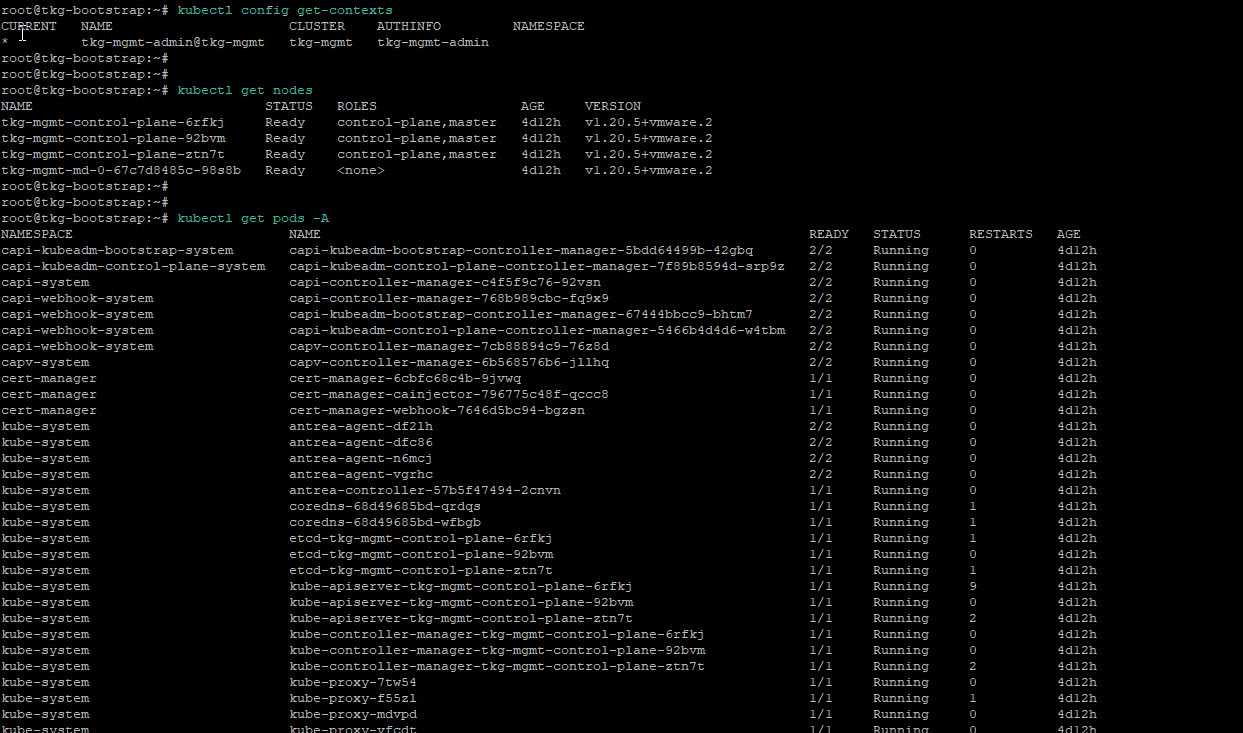
Verify Management Cluster
Post management cluster deployment, you can run the following commands to verify the health status of the cluster:
|
1 2 3 4 5 6 7 |
tanzu management-cluster get kubectl config use-context <mgmt_cluster_name>-admin@<mgmt_cluster_name> kubectl get nodes kubectl get pods -A |
Now you are all set to deploy the TKG workload cluster.
Deploy TKG Workload Cluster
The process of creating a workload cluster is similar to creating the management cluster. Follow the commands below to create a new workload cluster for your applications.
1: Set the context for the management cluster
|
1 |
# kubectl config use-context <mgmt_cluster_name>-admin@<mgmt_cluster_name> |
2: Create a K8 namespace
|
1 |
# kubectl create ns wld01 |
3: Prepare the YAML file for workload cluster deployment
If you want to leverage NSX ALB for your workload cluster, you can simply copy the YAML file that the UI installer generated for you during management cluster deployment and change the deployment parameters, such as:
- Network: Specify the logical segment where TKG workload cluster VMs will connect.
- VM Folder/Resource Pool: If you are planning to separate the TKG workload cluster from the TKG management cluster and have created a separate folder/resource pool for this, specify them in the deployment YAML file.
- Service/Pod CIDR: Optionally, you can change the pod/service CIDR for the workload cluster.
A sample YAML file is shown below for workload cluster deployment.
4: Modify NSX ALB Service Engine
Edit the Service Engine VM settings and attach the K8 network to the first available free NIC.
5: Initiate TKG Workload Cluster Deployment
Run the below command to start creating your first workload cluster
# tanzu cluster create tkg-wld01 –file=workload.yaml -v 6
For a successful deployment, you will see the following log entries appearing on your screen
|
1 2 3 4 5 6 7 8 9 10 11 12 13 14 15 16 |
Using namespace from config: Validating configuration... Waiting for resource pinniped-info of type *v1.ConfigMap to be up and running configmaps "pinniped-info" not found, retrying cluster control plane is still being initialized, retrying Getting secret for cluster Waiting for resource tkg-wld01-kubeconfig of type *v1.Secret to be up and running Waiting for cluster nodes to be available... Waiting for resource tkg-wld01 of type *v1alpha3.Cluster to be up and running Waiting for resources type *v1alpha3.MachineDeploymentList to be up and running Waiting for resources type *v1alpha3.MachineList to be up and running Waiting for addons installation... Waiting for resources type *v1alpha3.ClusterResourceSetList to be up and running Waiting for resource antrea-controller of type *v1.Deployment to be up and running Workload cluster 'tkg-wld01' created |
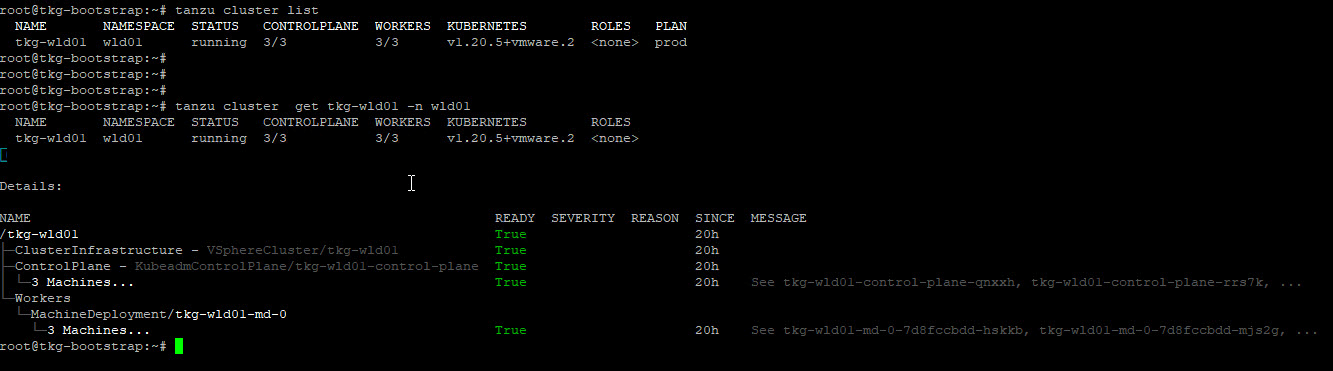
6: Verify Workload Cluster
Once the cluster is deployed, you can run the commands below to verify the health of the cluster.
|
1 2 3 |
# tanzu cluster list # tanzu cluster get <clustername> -n <namespace> |
7: Export the Cluster Kubeconfig
|
1 2 3 |
# tanzu cluster kubeconfig get tkg-wld01 -n wld01 --admin --export-file /root/wld01-kubeconfig.yaml Credentials of cluster 'tkg-wld01' have been saved You can now access the cluster by running 'kubectl config use-context tkg-wld01-admin@tkg-wld01' under path '/root/wld01-kubeconfig.yaml' |
Switch to the workload cluster context to start using it.
|
1 2 |
# kubectl config use-context tkg-wld01-admin@tkg-wld01 --kubeconfig=/root/wld01-kubeconfig.yaml Switched to context "tkg-wld01-admin@tkg-wld01". |
Install Avi Kubernetes Operator (AKO) in Workload Cluster
The Avi Kubernetes Operator (AKO) is a Kubernetes operator which works as an Ingress controller and performs Avi-specific functions in a Kubernetes environment with the Avi Controller. It runs as a pod in the cluster and translates the required Kubernetes objects to Avi objects and automates the implementation of ingresses/routes/services on the Service Engines (SE) via the Avi Controller.
Every workload cluster that you deploy should have an ako pod running in order to leverage NSX ALB for creating Virtual Services and VIP for VS. The ako pod is not present by default on the workload cluster, even if you have deployed it with NSX ALB settings in the deployment file.
To know more about AKO, please refer to the NSX ALB official documentation
At this point in time, your management cluster must have an AKO pod running under the namespace tkg-system-networking.
|
1 2 3 |
root@tkg-bootstrap:~# kubectl get pods -n tkg-system-networking NAME READY STATUS RESTARTS AGE ako-operator-controller-manager-76f5cf9695-vntml 2/2 Running 9 5d23h |
And if you check the logs for the ako-operator pod, you will see similar entries, indicating that Avi is not enabled on your workload cluster.
# kubectl logs -n tkg-system-networking -c manager -f ako-operator-controller-manager-76f5cf9695-vntml
|
1 2 3 4 5 6 7 8 9 10 11 12 13 14 15 16 17 |
{"level":"info","ts":1624874359.9679992,"logger":"controllers.Cluster","msg":"Cluster doesn't have AVI enabled, skip Cluster reconciling","Cluster":"default/tkg-mgmt","Cluster":"default/tkg-mgmt"} {"level":"info","ts":1624874360.0097146,"logger":"controllers.Cluster","msg":"Cluster not found, will not reconcile","Cluster":"default/tkg-mgmt"} {"level":"info","ts":1624875103.4353566,"logger":"controllers.AKODeploymentConfig","msg":"Add finalizer","AKODeploymentConfig":"/akodeploymentconfig-all","finalizer":"ako-operator.networking.tkg.tanzu.vmware.com"} {"level":"info","ts":1624875103.4354115,"logger":"controllers.AKODeploymentConfig","msg":"Start reconciling AVI Network Subnets","AKODeploymentConfig":"/akodeploymentconfig-all"} {"level":"info","ts":1624875105.3891804,"logger":"controllers.AKODeploymentConfig","msg":"No change detected for Network","AKODeploymentConfig":"/akodeploymentconfig-all","network":"Avi-VIP"} {"level":"info","ts":1624875105.3892171,"logger":"controllers.AKODeploymentConfig","msg":"Start reconciling AVI cloud usable networks","AKODeploymentConfig":"/akodeploymentconfig-all","cloud":"cloudVmc"} {"level":"info","ts":1624875105.5307646,"logger":"controllers.AKODeploymentConfig","msg":"Network is already one of the cloud's usable network","AKODeploymentConfig":"/akodeploymentconfig-all","cloud":"cloudVmc","ipam-profile":"https://192.168.15.20/api/ipamdnsproviderprofile/ipamdnsproviderprofile-f2e9cc92-2989-4223-901f-4609c33a67f5"} {"level":"info","ts":1624875105.5309565,"logger":"controllers.AKODeploymentConfig","msg":"No cluster matches the selector, skip","AKODeploymentConfig":"/akodeploymentconfig-all"} {"level":"info","ts":1624875105.7500613,"logger":"controllers.AKODeploymentConfig","msg":"No cluster matches the selector, skip","AKODeploymentConfig":"/akodeploymentconfig-all"} |
To deploy ako for the workload cluster, connect to your TKG management cluster and execute the following:
1: Apply the below label to your workload cluster
# kubectl label cluster <workload-cluster-name> service-type-loadbalancer-enabled=avi -n <namespace>
2: Create the yaml for deploying the AKO pod.
3: Create the AKO pod.
# kubectl create -f ako.yaml
This creates a pod named ako-0 in the workload cluster. You can switch to the workload cluster context and list the pod under avi-system namespace
|
1 2 3 4 5 6 |
root@tkg-bootstrap:~# kubectl get all -n avi-system --kubeconfig=/root/workload.yaml NAME READY STATUS RESTARTS AGE pod/ako-0 1/1 Running 0 161m NAME READY AGE statefulset.apps/ako 1/1 161m |
Logs for ako-operator in the management cluster show that Avi is now configured on the workload cluster.
|
1 2 3 4 5 6 7 8 9 10 11 12 13 14 15 16 17 18 19 |
{"level":"info","ts":1624886608.1287305,"logger":"controllers.AKODeploymentConfig","msg":"AVI user credentials managed by tkg system","AKODeploymentConfig":"/akodeploymentconfig-all","cluster":"wld01/tkg-wld01"} {"level":"info","ts":1624886608.401869,"logger":"controllers.AKODeploymentConfig","msg":"Successfully created/updated AVI User in AVI Controller","AKODeploymentConfig":"/akodeploymentconfig-all","cluster":"wld01/tkg-wld01"} {"level":"info","ts":1624886608.4208026,"logger":"controllers.AKODeploymentConfig","msg":"No AKO Secret found in th workload cluster, start the creation","AKODeploymentConfig":"/akodeploymentconfig-all","cluster":"wld01/tkg-wld01"} {"level":"info","ts":1624886608.425882,"logger":"controllers.AKODeploymentConfig","msg":"Label already applied to cluster","AKODeploymentConfig":"/akodeploymentconfig-all","cluster":"wld01/tkg-wld01","label":"networking.tkg.tanzu.vmware.com/avi"} {"level":"info","ts":1624886608.4259088,"logger":"controllers.AKODeploymentConfig","msg":"Starts reconciling ClusterResourceSet","AKODeploymentConfig":"/akodeploymentconfig-all","cluster":"wld01/tkg-wld01"} {"level":"info","ts":1624891561.7003517,"logger":"controllers.Machine","msg":"Start reconciling","Machine":"wld01/tkg-wld01-md-0-7d8fccbdd-s8q5l","Cluster":"wld01/tkg-wld01"} {"level":"info","ts":1624891561.7028077,"logger":"controllers.Machine","msg":"Start reconciling","Machine":"wld01/tkg-wld01-control-plane-wgkzf","Cluster":"wld01/tkg-wld01"} {"level":"info","ts":1624891561.7086272,"logger":"controllers.Machine","msg":"Start reconciling","Machine":"wld01/tkg-wld01-md-0-7d8fccbdd-hskkb","Cluster":"wld01/tkg-wld01"} {"level":"info","ts":1624891561.7099395,"logger":"controllers.Machine","msg":"Start reconciling","Machine":"wld01/tkg-wld01-md-0-7d8fccbdd-mjs2g","Cluster":"wld01/tkg-wld01"} {"level":"info","ts":1624891561.7112215,"logger":"controllers.Machine","msg":"Start reconciling","Machine":"wld01/tkg-wld01-control-plane-qnxxh","Cluster":"wld01/tkg-wld01"} |
Deploy Sample Application
Now that you have got the ako pod deployed for the workload cluster, it’s time to deploy a sample app of the type load balancer and verify that it creates objects (VS, VIP, Pool, etc) in Avi, and you can access the app.
I have deployed an application called yelb using the YAML file below.
# kubectl create -f yelb.yaml
|
1 2 3 4 5 6 |
root@tkg-bootstrap:~# kubectl get pods -n yelb --kubeconfig=/root/workload.yaml NAME READY STATUS RESTARTS AGE redis-server-576b9667ff-52btx 1/1 Running 0 8h yelb-appserver-7f784ccd64-vtxlx 1/1 Running 0 8h yelb-db-7cdddcff5-km67v 1/1 Running 0 8h yelb-ui-f6b557d47-v772q 1/1 Running 0 8h |
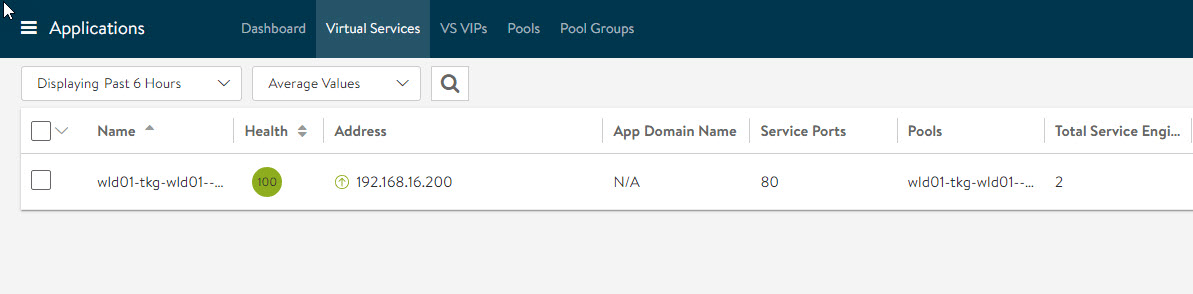
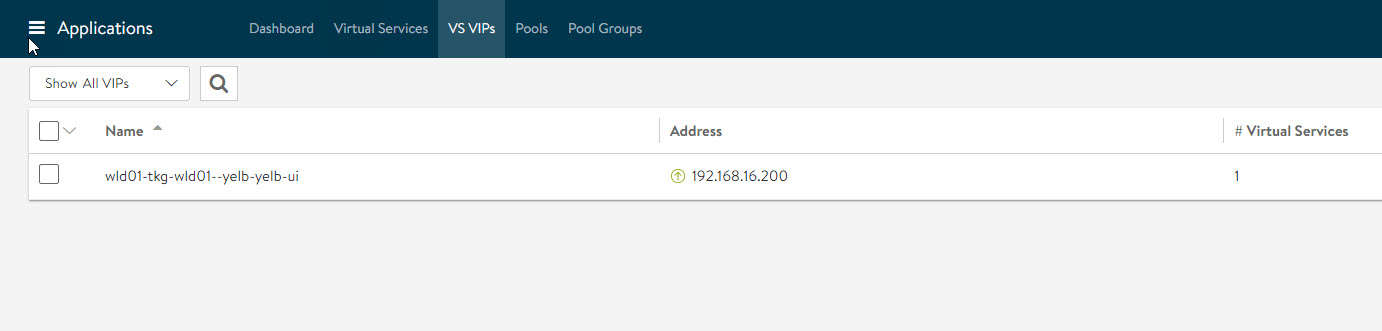
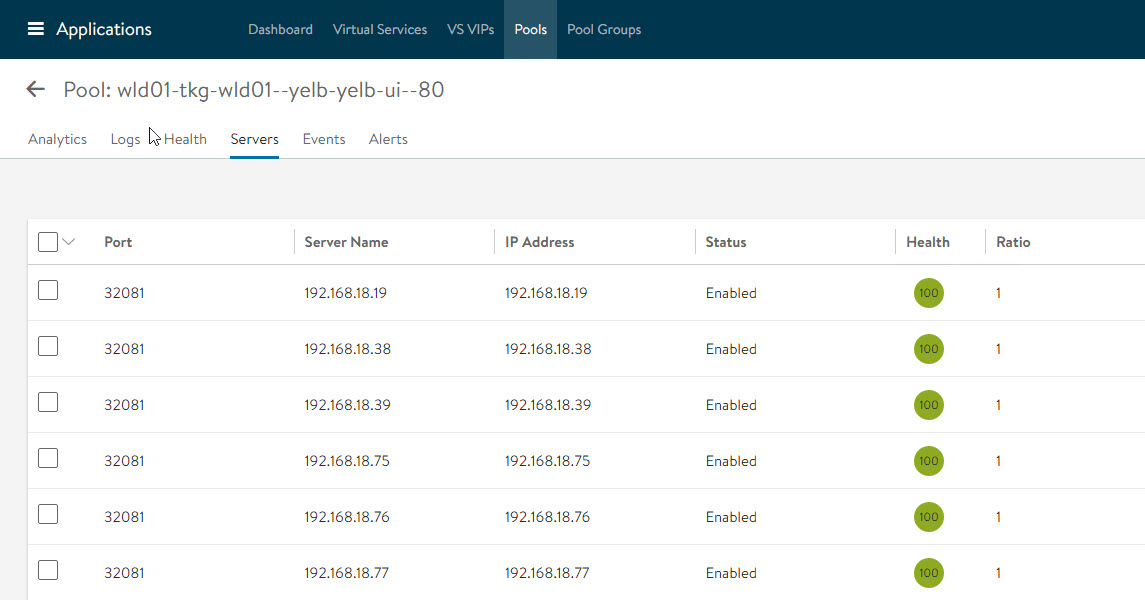
Login to NSX ALB and verify that a VS and VIP have been created for the yelb application.
Virtual Service
VIP
Server Pool
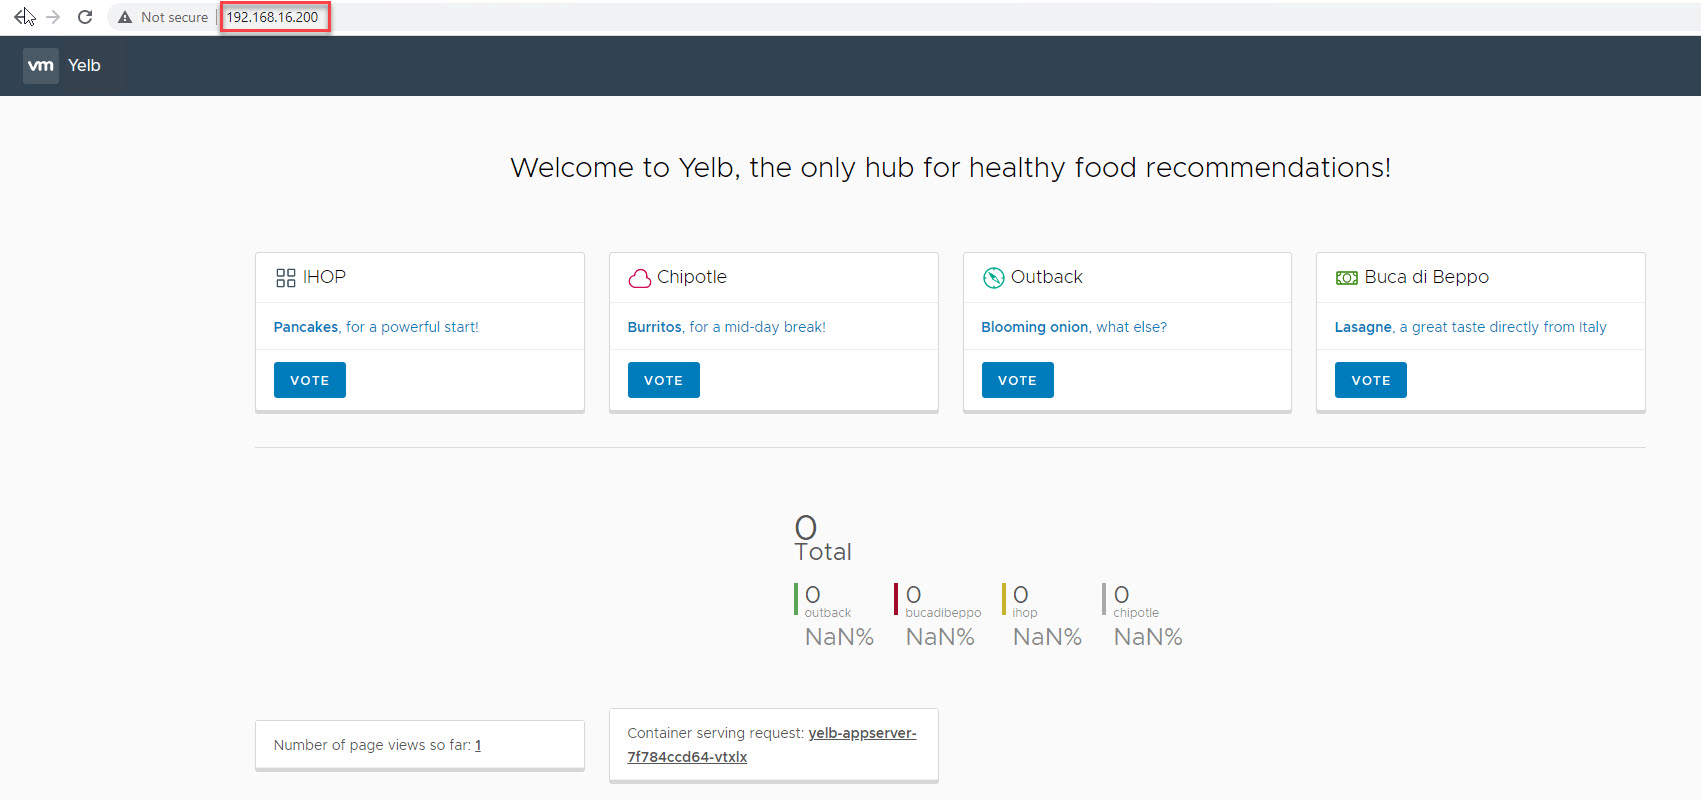
On hitting the VIP, I can access the application dashboard.
That’s it for this post. I hope you enjoyed reading this post. Feel free to share this on social media if it is worth sharing
One thought on “Tanzu Kubernetes Grid 1.3 Deployment with NSX ALB in VMC”
Comments are closed.