While working on an HCX related request from one of the hyperscaler, I came across an interesting ask where hyperscaler is looking for automating HCX upgrade via API.
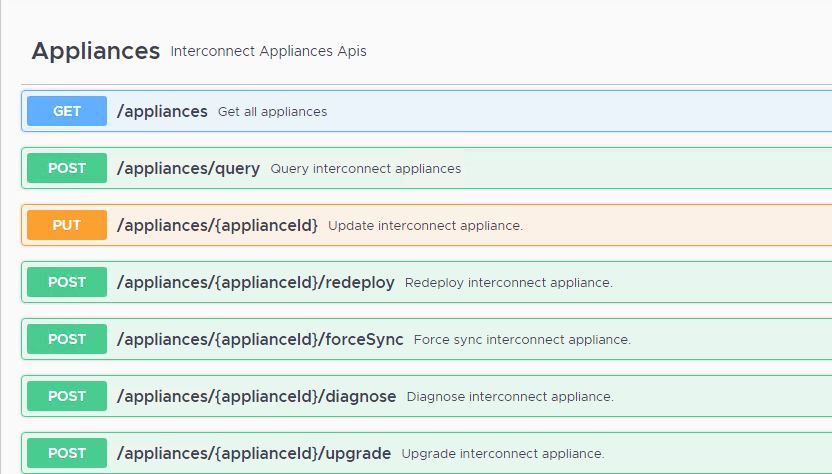
On checking HCX’s official API guide and swagger documentation and did not found any API to upgrade the HCX Manager appliance. The only available API’s are to upgrade HCX interconnect appliances.
After searching through internal documentation for an hour, I did not found any concrete info and I decided to explore the Network Inspect option in a browser which exposes APIs for any operation you trigger from UI.
In this post, I am going to demonstrate what are the API calls needed for a successful HCX Manager upgrade.
Disclaimer: HCX Manager upgrade APIs are not yet supported officially and will be shipped with the upcoming release of HCX.
Step 1: Check HCX Appliance Current Upgrade Status
Although this step is optional, I would recommend verifying the current upgrade status to ensure you do not accidentally attempt to upgrade an appliance that is already on the target version.
|
1 2 3 4 5 6 7 8 9 10 11 12 13 |
Method: POST URL: https://<hcx-manager-fqdn>:9443/api/1.0/appliance-management/jsonrpc/upgrade Content-Type: application/json Request Body: { "method":"getUpgradeStatus", "id":"getUpgradeStatus-NSX", "params":["NSX"] } |
Response Output: From the response output, we can see the status of the upgrade is “NOT_STARTED”
Step 2: Upload Upgrade Bundle to HCX Manager Appliance
|
1 2 3 4 5 |
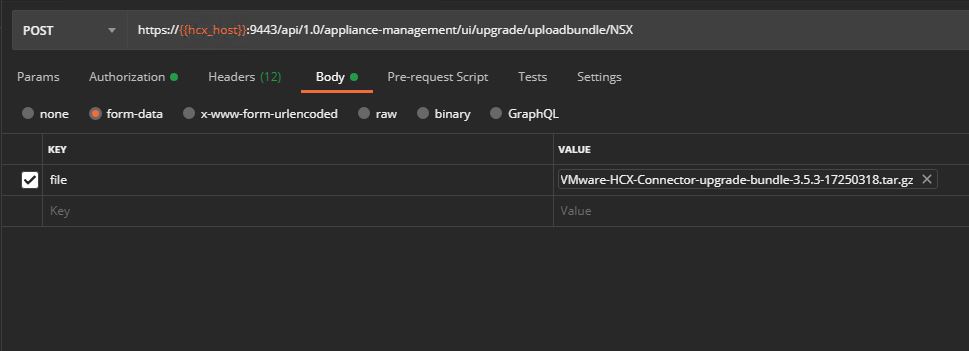
Method: POST URL: https://<hcx-manager-fqdn>:9443/api/1.0/appliance-management/ui/upgrade/uploadbundle/NSX Body: form-data, Key:file, value: 'Upgrade Bundle File Name' |
The below screenshot shows how to do it via postman.
And the equivalent curl command for the same
|
1 |
curl --location --request POST 'https://<hcx-manager-fqdn>:9443/api/1.0/appliance-management/ui/upgrade/uploadbundle/NSX' --header 'Content-Type: application/json' --form 'file=@"/C:/Users/Administrator/Downloads/ova/VMware-HCX-Connector-upgrade-bundle-3.5.3-17250318.tar.gz"' |
Step 3: Verify Upgrade Bundle Info
|
1 2 3 4 5 6 7 8 9 10 11 12 13 |
Method: POST URL: https://<hcx-manager-fqdn>:9443/api/1.0/appliance-management/jsonrpc/upgrade Headers: Content-Type: application/json Request Body: { "method":"getUpgradeBundleInformation", "id":"getUpgradeBundleInformation-NSX", "params":["NSX"] } |
Response Output
Step 4: Trigger Upgrade
|
1 2 3 4 5 6 7 8 9 10 11 12 13 |
Method: POST URL: https://<hcx-manager-fqdn>:9443/api/1.0/appliance-management/jsonrpc/upgrade Headers: Content-Type: application/json Request Body: { "method":"startUpgradeProcess", "id":"startUpgradeProcess-NSX", "params":[ "NSX", null ] } |
Step 5: Verify Upgrade Status
|
1 2 3 4 5 6 7 8 9 10 11 |
Method: POST URL: https://<hcx-manager-fqdn>:9443/api/1.0/appliance-management/jsonrpc/upgrade Request Body: { "method":"getUpgradeStatus", "id":"getUpgradeStatus-NSX", "params":["NSX"] } |
Response Output: When the upgrade is underway
Response Output: When the upgrade is completed
I hope you enjoyed reading this post. Feel free to share this on social media if it is worth sharing 🙂