In the last post of this series, I discussed configuring Cloudian so that we can enable its integration with vMware Cloud Director.
In this post, I will walk through the steps of installing and configuring OSE and its integration with Cloudian.
If you have landed directly on this post by mistake, I would recommend reading previous articles from this series:
1: Introduction & Architecture of VCD OSE
3: Installing Cloudian Hyperstore
4: Configuring Cloudian for VCD Integration
Installation Requirements
1a: OS Requirements: VCD OSE is shipped as an RPM package and can be installed on the OSE supported version of the Linux distribution. The following Linux OS are supported:
- CentOS 7/7
- RedHat Enterprise Linux 7
- Oracle Linux 7
Also, OSE needs Java 1.8 installed on the machine where OSE rpm will be installed.
1b: Hardware Requirements: OSE is deployed in three form factors. Small, medium, and large. In small form factor, the OSE server needs:
- 4 vCPU
- 8 GB RAM
- 120 GB Disk space
For medium and large deployment requirements, please refer to the OSE Documentation
1c: Database Requirements: VCD OSE supports Postgresql 10.x version. If your vCD installation is backed by Postgres 10 DB, you can leverage the same DB or have a dedicated instance just for OSE.
The current version of VCD OSE is 1.5 and can be downloaded from here
Once you have obtained the installer rpm, upload it to the OSE server via WinSCP or a similar utility.
1d: Network Port Requirements: Please refer to the official documentation for this.
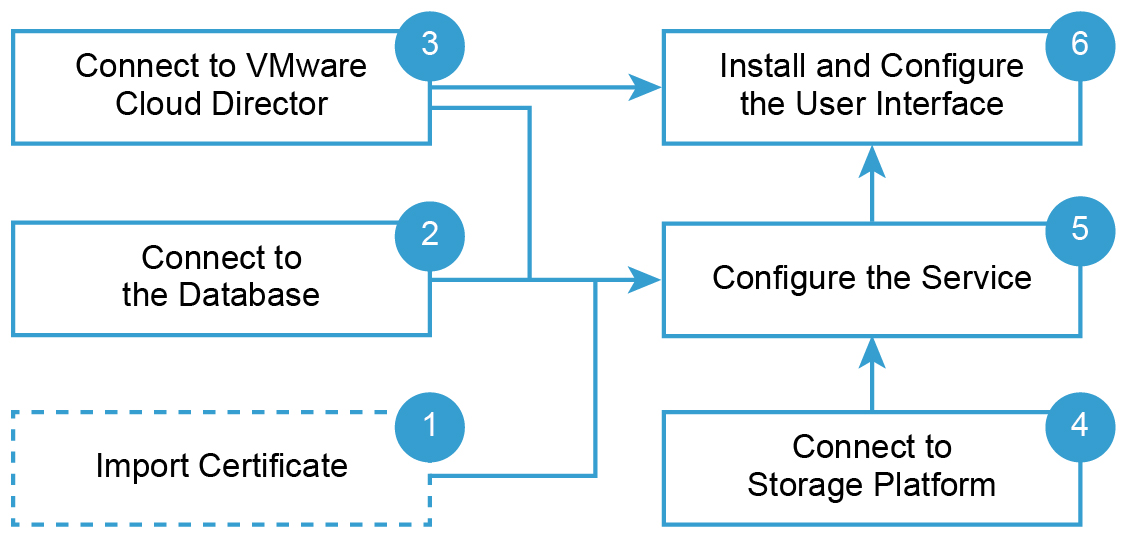
OSE Installation Workflow
The below image, taken from the OSE product documentation, shows the high-level workflow for installing and configuring VCD OSE.
2a: Install Postgres 10 Database
|
1 2 3 4 5 6 7 |
# yum install https://download.postgresql.org/pub/repos/yum/10/redhat/rhel-7.6-x86_64/pgdg-redhat-repo-latest.noarch.rpm # yum install -y postgresql10-server postgresql10 # /usr/pgsql-10/bin/postgresql-10-setup initdb # systemctl start postgresql-10 && systemctl enable postgresql-10 |
2b: Configure Postgres DB
|
1 2 3 4 5 6 7 8 9 |
# sed -i "s|#listen_addresses = 'localhost'|listen_addresses = '*'|g" /var/lib/pgsql/10/data/postgresql.conf # vim /var/lib/pgsql/10/data/pg_hba.conf ensure host entry looks like below host all all 0.0.0.0/0 md5 # systemctl restart postgresql-10 |
2c: Create OSE Database And User
# su – postgres
-bash-4.2$ psql
|
1 2 3 4 5 6 7 8 |
postgres=# create user oseadmin with password 'VMware1!'; CREATE ROLE postgres=# create database osedb owner oseadmin; CREATE DATABASE postgres=# grant all privileges on database osedb to oseadmin; GRANT |
2d: Install OSE Binary
|
1 |
# yum install vmware-ose-1.5.0-16046355.el7.x86_64.rpm -y |
OSE Configuration Steps
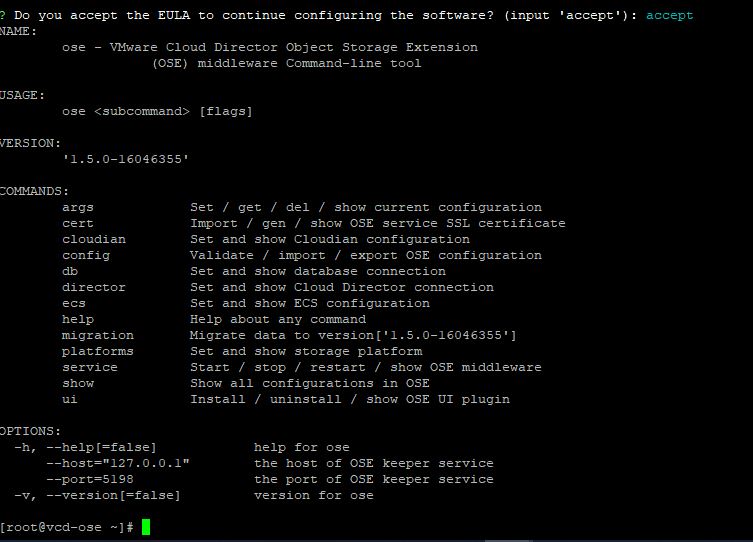
3a: Accept EULA: Accept the OSE license agreement by running the command: ose
3b: Generate self-signed certificates for OSE
# ose cert gen –cn <ose-fqdn> –secret <secret>
|
1 2 3 4 5 6 7 8 9 10 11 12 13 14 15 |
[root@ose ~]# ose cert gen --cn vcd-ose.mgmt.vmw --secret VMware1! [Summary] Certificate[0] CommonName : vcd-ose.mgmt.vmw Organization : VMware, Inc. OrganizationalUnit : TestUnit Locality : Palo Alto Province : California Country : US Not Before : 2020-05-20 07:57:04 +0000 UTC Not After : 2025-05-19 07:57:04 +0000 UTC FriendlyName : vcd-ose.mgmt.vmw [Path] /opt/vmware/voss/conf/voss-keystore.p12 |
3c: Configure Database Connection
# ose db set –url=jdbc:postgresql://127.0.0.1:5432/<db-name> –user=<db-user> –secret=<db-passwd>
Note: We have defined dbname, dbuser, and dbpassword in step 2c
|
1 2 3 4 5 6 |
[root@ose ~]# ose db set --url=jdbc:postgresql://127.0.0.1:5432/osedb --user=oseadmin --secret=VMware1! Changed the config Database successfully [Database] URL : jdbc:postgresql://127.0.0.1:5432/osedb username : oseadmin |
3d: Configure VCD Connection
# ose director set –url=https://<vcd-fqdn>/ –user=<vcd-admin@system> –secret=<vcd-admin-passwd>
|
1 2 3 4 5 6 7 8 9 10 11 12 13 14 15 |
[root@ose ~]# ose director set --url=https://vcd.cloud.vmw --user=administrator@system --secret=VMware123! The target endpoint claims below SSL certificate. [CommonName] : *.lab.vmw [OrganizationalUnit] : [VMWLAB] [Organization] : [VMW] [Country] : [IN] [Locality] : [Bangalore] [Fingerprint] : 4f65c316915629a62d270dc7e30e83630c11c5a3e7195cc039a4df3aac2207a5 ? Do you trust this certificate for the SSL connection? Yes Changed the config Cloud Director successfully [Cloud Director] URL : https://vcd.cloud.vmw username : administrator@system |
3e: Install the VCD OSE UI Plug-in
# ose ui install –ose-url https://<ose-fqdn>:443/
|
1 2 3 4 5 6 7 8 9 10 11 12 13 14 15 16 17 18 19 20 21 |
[root@ose ~]# ose ui install --ose-url https://vcd-ose.mgmt.vmw:443 [Installed Plugin Info] OSE public URL : https://vcd-ose.mgmt.vmw:443/ VIP Host : https://vcd-ose.mgmt.vmw:443/ VIP Pseudo : false VIP CollectSource : false [Plugin Detail] Plugin Name : VMware Cloud Director® Object Storage Extension™ Vendor : VMware Version : 1.5.0-16046355 Enabled : true ID : urn:vcloud:uiPlugin:994081c5-7046-40b2-8d30-4625af351ed6 Plugin Status : ready Tenant Scoped : true Provider Scoped : true Description : Object Storage UI Extension. License : Copyright © 2019-2020 VMware, Inc. All rights reserved. Link : http://www.vmware.com/support Resource Path : https://vcd.cloud.vmw/tenant/System/uiPlugins/994081c5-7046-40b2-8d30-4625af351ed6/39a1c997-90e1-4cbd-a17b-fe8ed6d23ada |
Integrate OSE with Cloudian Hyperstore
4a: Start the VCD OSE Keeper service.
|
1 |
# systemctl start voss-keeper |
4b: Configure Cloudian Admin Service API Endpoint
# ose cloudian admin set –url=https://<cloudian-fqdn>:19443 –user=sysadmin –secret=public –force=true
|
1 2 3 4 5 6 7 8 9 10 11 12 13 14 15 |
[root@ose ~]# ose cloudian admin set --url=https://192.168.201.71:19443 --user=sysadmin --secret=public --force=true The target endpoint claims below SSL certificate. [CommonName] : s3-admin.rp1.vmw [OrganizationalUnit] : [Cloudian] [Organization] : [Cloudian] [Country] : [US] [Locality] : [San Mateo] [Fingerprint] : 6d095f68c9b07539cfcd7ca54204d4b5fc644f87cfd1e040b345c2c4a1a12a81 ? Do you trust this certificate for the SSL connection? Yes Changed the config Cloudian Admin successfully [Cloudian Admin] URL : https://192.168.201.71:19443 username : sysadmin |
4c: Configure Cloudian HyperStore S3 Service Endpoint
# ose cloudian s3 set –url=https://<cloudian-ip>:443

4d: Configure Cloudian HyperStore IAM Service Endpoint
# ose cloudian iam set –url=http://<cloudian-fqdn>:16080
|
1 2 3 4 |
[root@ose ~]# ose cloudian iam set --url=http://192.168.201.71:16080 Changed the config Cloudian IAM successfully [Cloudian IAM] URL : http://192.168.201.71:16080 |
4e: Configure Cloudian Management Console Endpoint
# ose cloudian console set –url=https://<cloudian-fqdn>:8443 –user=admin –secret=<admin-password>
|
1 2 3 4 5 6 7 8 9 10 11 12 13 14 15 |
[root@ose ~]# ose cloudian console set --url=https://192.168.201.71:8443 --user=admin --secret=VMware123! The target endpoint claims below SSL certificate. [CommonName] : cmc.rp1.vmw [OrganizationalUnit] : [Cloudian] [Organization] : [Cloudian] [Country] : [US] [Locality] : [San Mateo] [Fingerprint] : da47769e5de70405ee01defe2e0f67a6bd52725b8717112b15009d401c963701 ? Do you trust this certificate for the SSL connection? Yes Changed the config Cloudian Console successfully [Cloudian Console] URL : https://192.168.201.71:8443 username : admin |
4f: Enable Cloudian Platform
# ose platforms enable cloudian

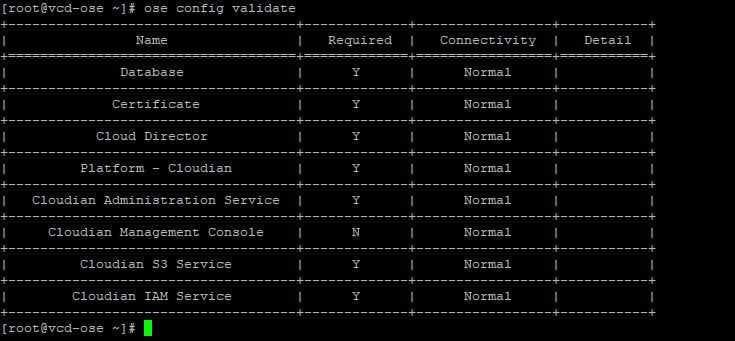
4g: Validate VCD OSE Configuration
# ose config validate

4h: Restart OSE Keeper Service
# systemctl restart voss-keeper
With this, we have finished installing, configuring, and integrating VCD OSE with VCD and Cloudian.
In the next post of this series, I will walk through the OSE configuration steps that need to be done by CSPs and tenants.
I hope you enjoyed reading this post. Feel free to share this on social media if it is worth sharing 🙂


