Yesterday while working on one of the production issue where we had to deprovision a tenant environment in vCloud Air, I noticed that independent disks were preventing automated deprovision of the environment and the error messages were loud and clear in the log files.
It was a new issue for me so I started reading about independent disks in vCloud Director and want to share few things about this.
First of all independent Disk feature in vCD is completely different from an Independent Disk in vSphere. Independent disks can be shared across multiple vApps/VM’s in vCloud Director. This feature was first introduced in vCD v5.1.
Following quote from vCloud Architecture Toolkit document rightly explains about independent disks
The use of independent disks with vCloud Director allows updates of virtual machines without impacting the underlying data.
The feature is designed to enable users to create virtual disks which can be attached to and detached from virtual machines. There is no functionality to control this feature from the vCD UI and this can be controlled via API’s only.
When you create an independent disk, it is associated with an organization vDC but not with a virtual machine. After the disk has been created, the disk owner or an administrator can attach it to any virtual machine deployed in that vDC, detach it from a virtual machine, and remove it from the vDC.
Presence of Independent disks in vCD can be seen on navigating to Org > Administration > Org vDC > Independent Disks tab. If you right click on any of the disk you will not see any action window opening.

In this post I am going to demonstrate how we can detach/delete independent disks from VM via API calls. Lets get started.
For sake of this demonstration, I have used some hypothetical names for Org and Org vDC.
Step 1: Obtain vCD Auth token code
# curl -sik -H “Accept:application/*+xml;version=5.6” -u “admin@system” -X POST https://vCD-FQDN/api/sessions | grep auth
Enter host password for user ‘admin@system’:
x-vcloud-authorization: Auth
Step 2: Locate your Org
# curl -sik -H “Accept:application/*+xml;version=5.6” -H “x-vcloud-authorization:Auth” -X GET https://vCD-FQDN/api/org/
On using the above API call, you will see a href to all your Org that are present in vCD. For your next query chose the href of the org where independent disks are lying.
|
1 2 3 4 5 |
<Org href="https://vCD-FQDN:443/api/org/08356307-2939-42d3-a2a2-aeccef6478e4" name="ABC" type="application/vnd.vmware.vcloud.org+xml"/> <Org href="https://vCD-FQDN:443/api/org/2b729e6f-588e-49c4-964f-89b2e744c075" name="DEF" type="application/vnd.vmware.vcloud.org+xml"/> <Org href="https://vCD-FQDN:443/api/org/fc432145-f1f3-42f6-a26f-eeb3d306a405" name="GHI" type="application/vnd.vmware.vcloud.org+xml"/> |
Step 3: Locate your Org vDC
# curl -sik -H “Accept:application/*+xml;version=5.6” -H “x-vcloud-authorization: Auth” -X GET https://vCD-FQDN:443/api/org/fc432145-f1f3-42f6-a26f-eeb3d306a405 | grep vdc
|
1 |
<Link rel="down" href="https://vCD-FQDN:443/api/vdc/adf0929b-a107-4671-9f85-b629b744c2b7" name="VDC1" type="application/vnd.vmware.vcloud.vdc+xml"/> |
Use the above href of your org vDC in next query.
Step 4: Find the href of all independent disks
# curl -sik -H “Accept:application/*+xml;version=5.6” -H “x-vcloud-authorization:Auth” -X GET https://vCD-FQDN:443/api/vdc/adf0929b-a107-4671-9f85-b629b744c2b7 | grep disk
|
1 2 3 4 5 |
<ResourceEntity href="https://vCD-FQDN:443/api/disk/e5a1726c-60ff-4f43-bd86-b1ad13f4b0ab" name="0d48b7d7-5a50-4285-a168-b77a01796abc" type="application/vnd.vmware.vcloud.disk+xml"/> <ResourceEntity href="https://vCD-FQDN:443/api/disk/f78e306e-fe87-476f-b961-719c176806a0" name="cf030244-2093-4130-916f-588e0720826f" type="application/vnd.vmware.vcloud.disk+xml"/> <ResourceEntity href="https://vCD-FQDN:443/api/disk/f1d99e1c-b175-4715-a7bc-322be23a07a3" name="d94f0956-a2eb-4404-8726-1361775e2215" type="application/vnd.vmware.vcloud.disk+xml"/> |
Step 5: Find the name of associated VM with the independent disk
First we have to get href of the VM and then the actual VM name. This can be achieved via below queries:
# curl -sik -H “Accept:application/*+xml;version=5.6” -H “x-vcloud-authorization:Auth” -X GET https://vCD-FQDN:443/api/disk/f1d99e1c-b175-4715-a7bc-322be23a07a3 | grep attachedVms
|
1 |
<Link rel="down" href="https://vCD-FQDN:443/api/disk/f1d99e1c-b175-4715-a7bc-322be23a07a3/attachedVms" type="application/vnd.vmware.vcloud.vms+xml"/> |
# curl -sik -H “Accept:application/*+xml;version=5.6” -H “x-vcloud-authorization:Auth” -X GET https://vCD-FQDN:443/api/disk/f1d99e1c-b175-4715-a7bc-322be23a07a3/attachedVms | grep VmReference
|
1 |
<VmReference href="https://vCD-FQDN:443/api/vApp/vm-8998e541-a54c-432b-94ba-bafe0b7edd2f" name="b45f588f-c9a4-4f07-bc63-4123648587ab" type="application/vnd.vmware.vcloud.vm+xml"/> |
Step 6: Detach Independent Disk from VM
For detaching the independent disk, we have to take care of two things. First we have to pass “application/vnd.vmware.vcloud.diskAttachOrDetachParams+xml” as Content-Type in header. This is explained in vCD 8.x documentation
Also we have to create a XML file which have href of the independent disk which we obtained in Step 4
I have named my XML file as detach.xml with below content
|
1 2 3 4 5 6 7 |
<?xml version="1.0" encoding="UTF-8"?> <DiskAttachOrDetachParams xmlns="http://www.vmware.com/vcloud/v1.5"> <Disk type="application/vnd.vmware.vcloud.disk+xml" href="https://vCD-FQDN:443/api/disk/f1d99e1c-b175-4715-a7bc-322be23a07a3" /> </DiskAttachOrDetachParams> |
Also make sure to format your xml file in correct format. It can be done online by visiting xml-formatter website.
Now make following API call for detaching the disk
# curl -sik -H “Accept:application/*+xml;version=5.6” -H “Content-Type:application/vnd.vmware.vcloud.diskAttachOrDetachParams+xml” -H “x-vcloud-authorization:Auth” -d @detach.xml -X POST https://vCD-FQDN:443/api/vApp/vm-8998e541-a54c-432b-94ba-bafe0b7edd2f/disk/action/detach
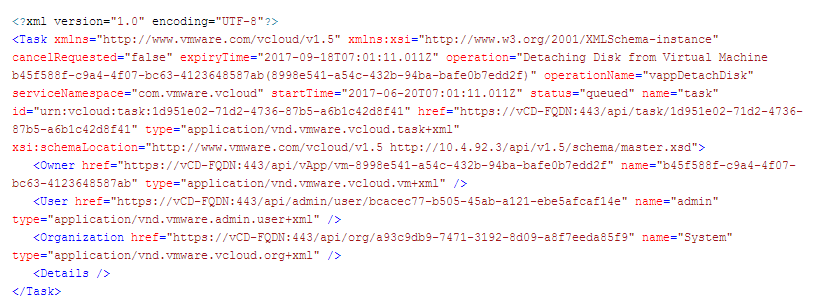
If you are not making any mistake then you should see a HTTP 202 Accepted header alongwith an xml file which list the details of the detach task triggered
HTTP/1.1 202 Accepted
Date: Tue, 20 Jun 2017 07:01:11 GMT
the xml output looks like below

Step 7: Delete independent disk
Supply the href of independent disk obtained in step 4 in below query
# curl -sik -H “Accept:application/*+xml;version=5.6” -H “x-vcloud-authorization:Auth” -X DELETE https://vCD-FQDN:443/api/disk/f1d99e1c-b175-4715-a7bc-322be23a07a3
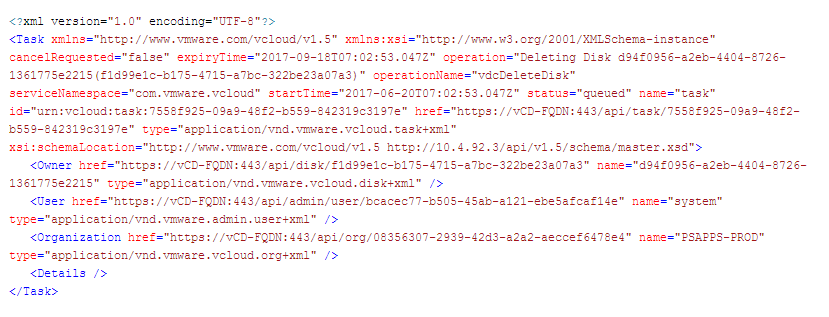
Again you should see 2 202 Accepted alongwith an xml file as output
HTTP/1.1 202 Accepted
Date: Tue, 20 Jun 2017 07:02:53 GMT

I hope you enjoyed reading this post. Feel free to share this on social media if it is worth sharing. Be sociable
