Welcome to part 5 of the NSX VRF series. In part 4, I discussed Inter-VRF routing that enables communication between VRF gateways in NSX by exchanging the routes that are not BGP, e.g., connected, NAT, and static routes, etc. In this post, I will discuss how route exchange can be facilitated over BGP.
If you are not following along, I encourage you to read the earlier parts of this series from the links below:
1: NSX VRF Gateway – Architecture & Configuration
2: VRF Config Validation & Traffic Flows
Introduction
Inter-VRF BGP route leaking allows routes learned in one VRF to be advertised to another VRF over BGP to enable communication between the isolated VRFs. It’s achieved through configuring BGP on Tier-0 VRF gateways and utilizing route maps and community lists to control the route leaking process.
BGP route leaking supports leaking both IPv4 & IPv6 address families.
Inter-VRF BGP route leaking uses BGP VPN to leak BGP routes and leverages route maps and community lists to filter and modify routes before they are leaked between VRFs, allowing for precise control over which routes are exchanged. NSX internally creates Route Targets (RTs) for route import and export.
Route Targets are used to control the distribution of routes within and between different VRF instances. They act as filters, ensuring that routes are only propagated to the appropriate tenants or VRFs. This helps isolate traffic within various parts of the network and prevents unwanted route propagation.
Benefits of Inter-VRF BGP Route Leaking
Inter-VRF BGP route leaking is helpful in:
- Enabling communication between different tenants or isolated environments.
- Creating multi-tenancy designs within NSX.
- Sharing routes between different VRFs for services like internet access or centralized management.
Inter-VRF BGP Route Leaking Configuration
The following steps are required to enable route leaking between two VRF gateways via BGP:
- Create IP Prefix List
- Create Route Map
- (optional) Create Community Lists
- Configure Inter-VRF Routing
Step 1: Create IP Prefix List
An IP prefix list contains single or multiple IP addresses that are assigned access permissions for route advertisement. IP prefix lists are referenced through BGP neighbor filters or route maps with in or out direction.
Edit the Tier-0 VRF gateway and click Set for IP Prefix Lists.
Provide a name for the prefix list and click Set to define the prefixes.
Specify the subnet CIDR that will be advertised to the other VRF gateway and set the action to permit.
You can set the network field to any to advertise all networks from the VRF gateway or even a single IP, depending on your use case.
Step 2: Create Route Map
A route map consists of a sequence of IP prefix lists, BGP path attributes, and an associated action.
Click on the Set button for the Route Maps setting.
Name the route map and click Set to add the match criteria.
For the match criteria, select IP Prefix and click Set to specify one or more match expressions.
Select the IP prefix list that you created in step 1.
Specify the AS Path Prepend and the community string. The supported values for the community strings are
- NO_EXPORT: Do not advertise outside the BGP confederation.
- NO_ADVERTISE: Do not advertise to any peer.
- NO_EXPORT_SUBCONFED: Do not advertise to EBGP peers.
Set the action to Permit and click Add to save the configuration.
Step 3: Configure Inter-VRF Routing
Click on the Set button for Inter-VRF Routing.
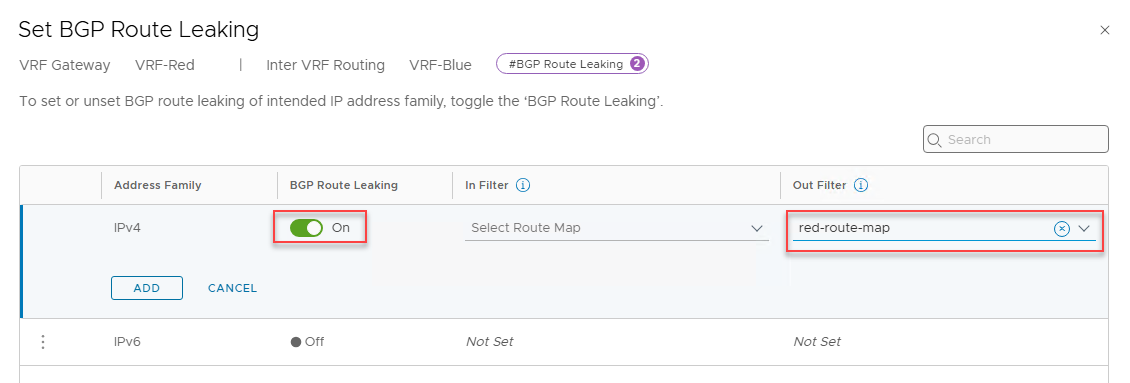
Under Connected Gateway, select the VRF gateway to which the route will be leaked and click on the Set button for BGP Route Leaking.
Click on the vertical ellipsis buttons to configure the address family that will be leaked over BGP.
Turn the BGP Route Leaking toggle to On, and for the Out Filter, select the route map that you created in step 2.
Repeat the steps for the other VRF gateway.
After you have enabled route leaking, NSX auto-creates an inter-vrf transit link between the VRF gateways. You can view the link and its IP address by navigating to the Tier-0 VRF gateway and expanding the Interfaces section.
Route Leak Validation
1: On listing the routes in the SR component of the VRF gateway, you will see the route is learned via BGP over the inter-vrf internal link.
2: In the DR components of the VRF gateways, you will see that the learned network has a route over the inter-vrf transit link.
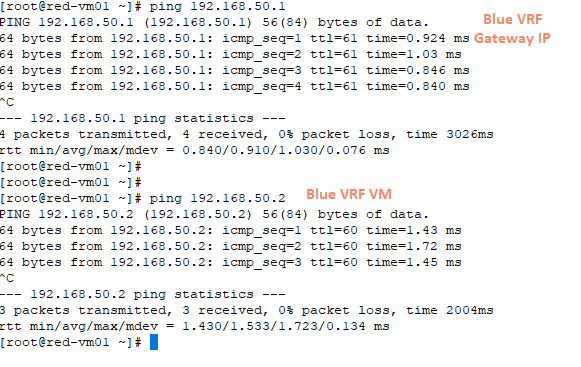
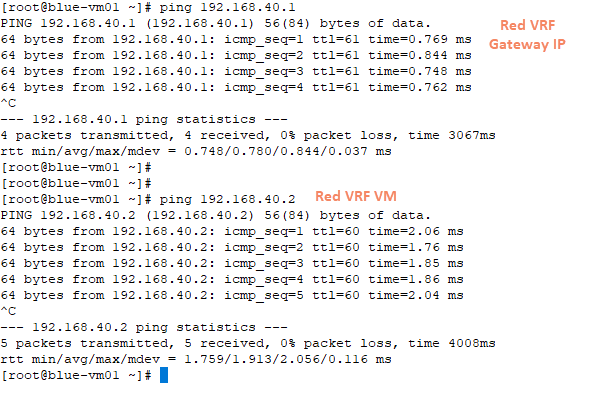
3: The red and blue VRF VMs can reach each other.
4: On tracing the path taken by the packet between the red and blue VRF communication, you can see that packets are delivered without going to the physical network. The packet is delivered directly over the inter-vrf transit link.
And that’s it for this post.
I hope you enjoyed reading this post. Feel free to share this on social media if it is worth sharing.


