Welcome to part 4 of the NSX VRF series. In part 3, I discussed VRF route leaking that allows communication between 2 data plane isolated VRF gateways in NSX.
In this post, I will discuss Inter-VRF routing.
If you are not following along, I encourage you to read the earlier parts of this series from the links below:
1: NSX VRF Gateway – Architecture & Configuration
2: VRF Config Validation & Traffic Flows
Inter-VRF routing was first introduced in NSX 4.1.0, and it allows exchanging routes between VRFs. The route exchange happens between VRFs over an internally plumbed Inter-VRF transit link.
You can configure Inter-VRF routing between:
- Parent Tier-0 gateway and Tier-0 VRF gateway.
- From Tier-0 VRF gateway to parent Tier-0 gateway.
- From one Tier-0 VRF gateway to another Tier-0 VRF gateway.
To exchange routes between the gateways, you can use one of the following methods:
- Inter-VRF Route Advertisement – Advertise routes that are not BGP, such as static, connected, NAT, etc, that are available as inter-vrf static routes on the connected gateway.
- Inter-VRF BGP Route Leaking – Enable BGP route leak for IPv4/IPv6 or both address families.
In this post, I will demonstrate how to exchange routes between 2 VRF gateways using the Inter-VRF route advertisement technique.
With Inter-VRF Route Advertisement, you can configure advertisement rules to advertise routes and prefixes on the connected gateways to create inter-VRF routing between two VRFs.
To configure route advertisement, edit the Tier-0 VRF gateway and click Set on Inter VRF Routing.
Under Connect Gateway, select the target VRF gateway from which the route will be imported and click on Set for Advertisement Rules.
Select the route types that you want to import and set the advertisement action to Allow.
You can also limit the routes by specifying a specific subnet. If you leave it blank, Route Advertisement Type filters must be applied.
Click on Add to complete the route advertisement wizard.
Repeat the steps for the Blue VRF Tier-0 gateway.
Validation
1: Login to the Red and Blue VM and ping the destination networks and validate that you are getting a result.
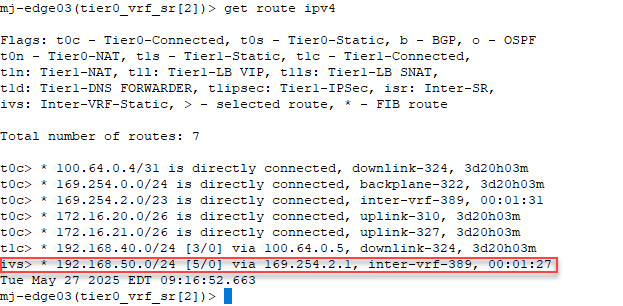
2: Validate that the routes appear in the VRF gateway’s SR component.
The routes are learned over an auto-plumbed interface called inter-vrf.
This interface is auto-created by NSX and can be viewed by navigating to the Tier-0 VRF gateway and expanding the Interfaces section.
Tracepath from the VMs clearly shows traffic crossing the DR components of the Tier-1 gateways
And that’s it for this post.
I hope you enjoyed reading this post. Feel free to share this on social media if it is worth sharing.


